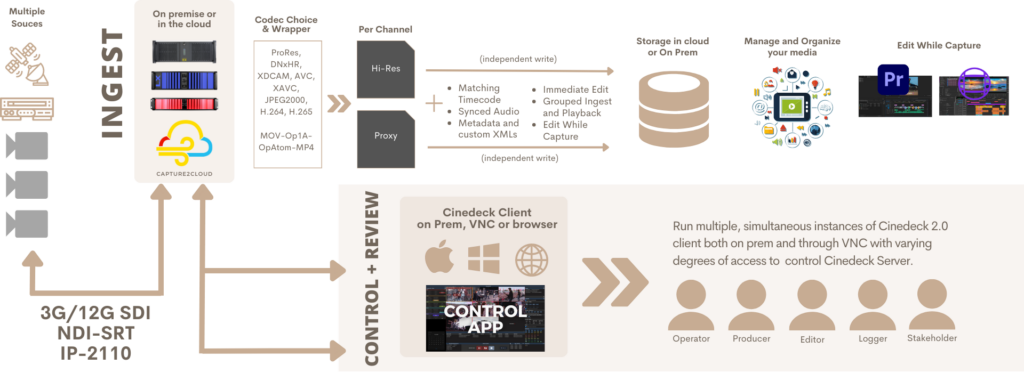
For over a decade, Cinedeck has been at the forefront of multicam video production, offering adaptable solutions for both cloud and on-premise setups. We take pride in our capacity to transcend traditional limits, developing imaginative workflows and forging customized, effective solutions to meet your requirements.

Our proficiency is rooted in providing encoding for edit-ready formats, facilitating a smooth transition from camera to post-production, and streamlining file deliveries with our patented insert-edit technology. Our devoted team is constantly working to create tools that enable you to refine your workflows and boost your productivity.

Schedule a Demo or Request a Trial License

Supported Workflows

Cinedeck caters to an array of workflows, encompassing live events, studio multicam, archival projects, and beyond. Explore the workflows below to discover how we infuse innovation, dependability, and redundancy into each unique application.
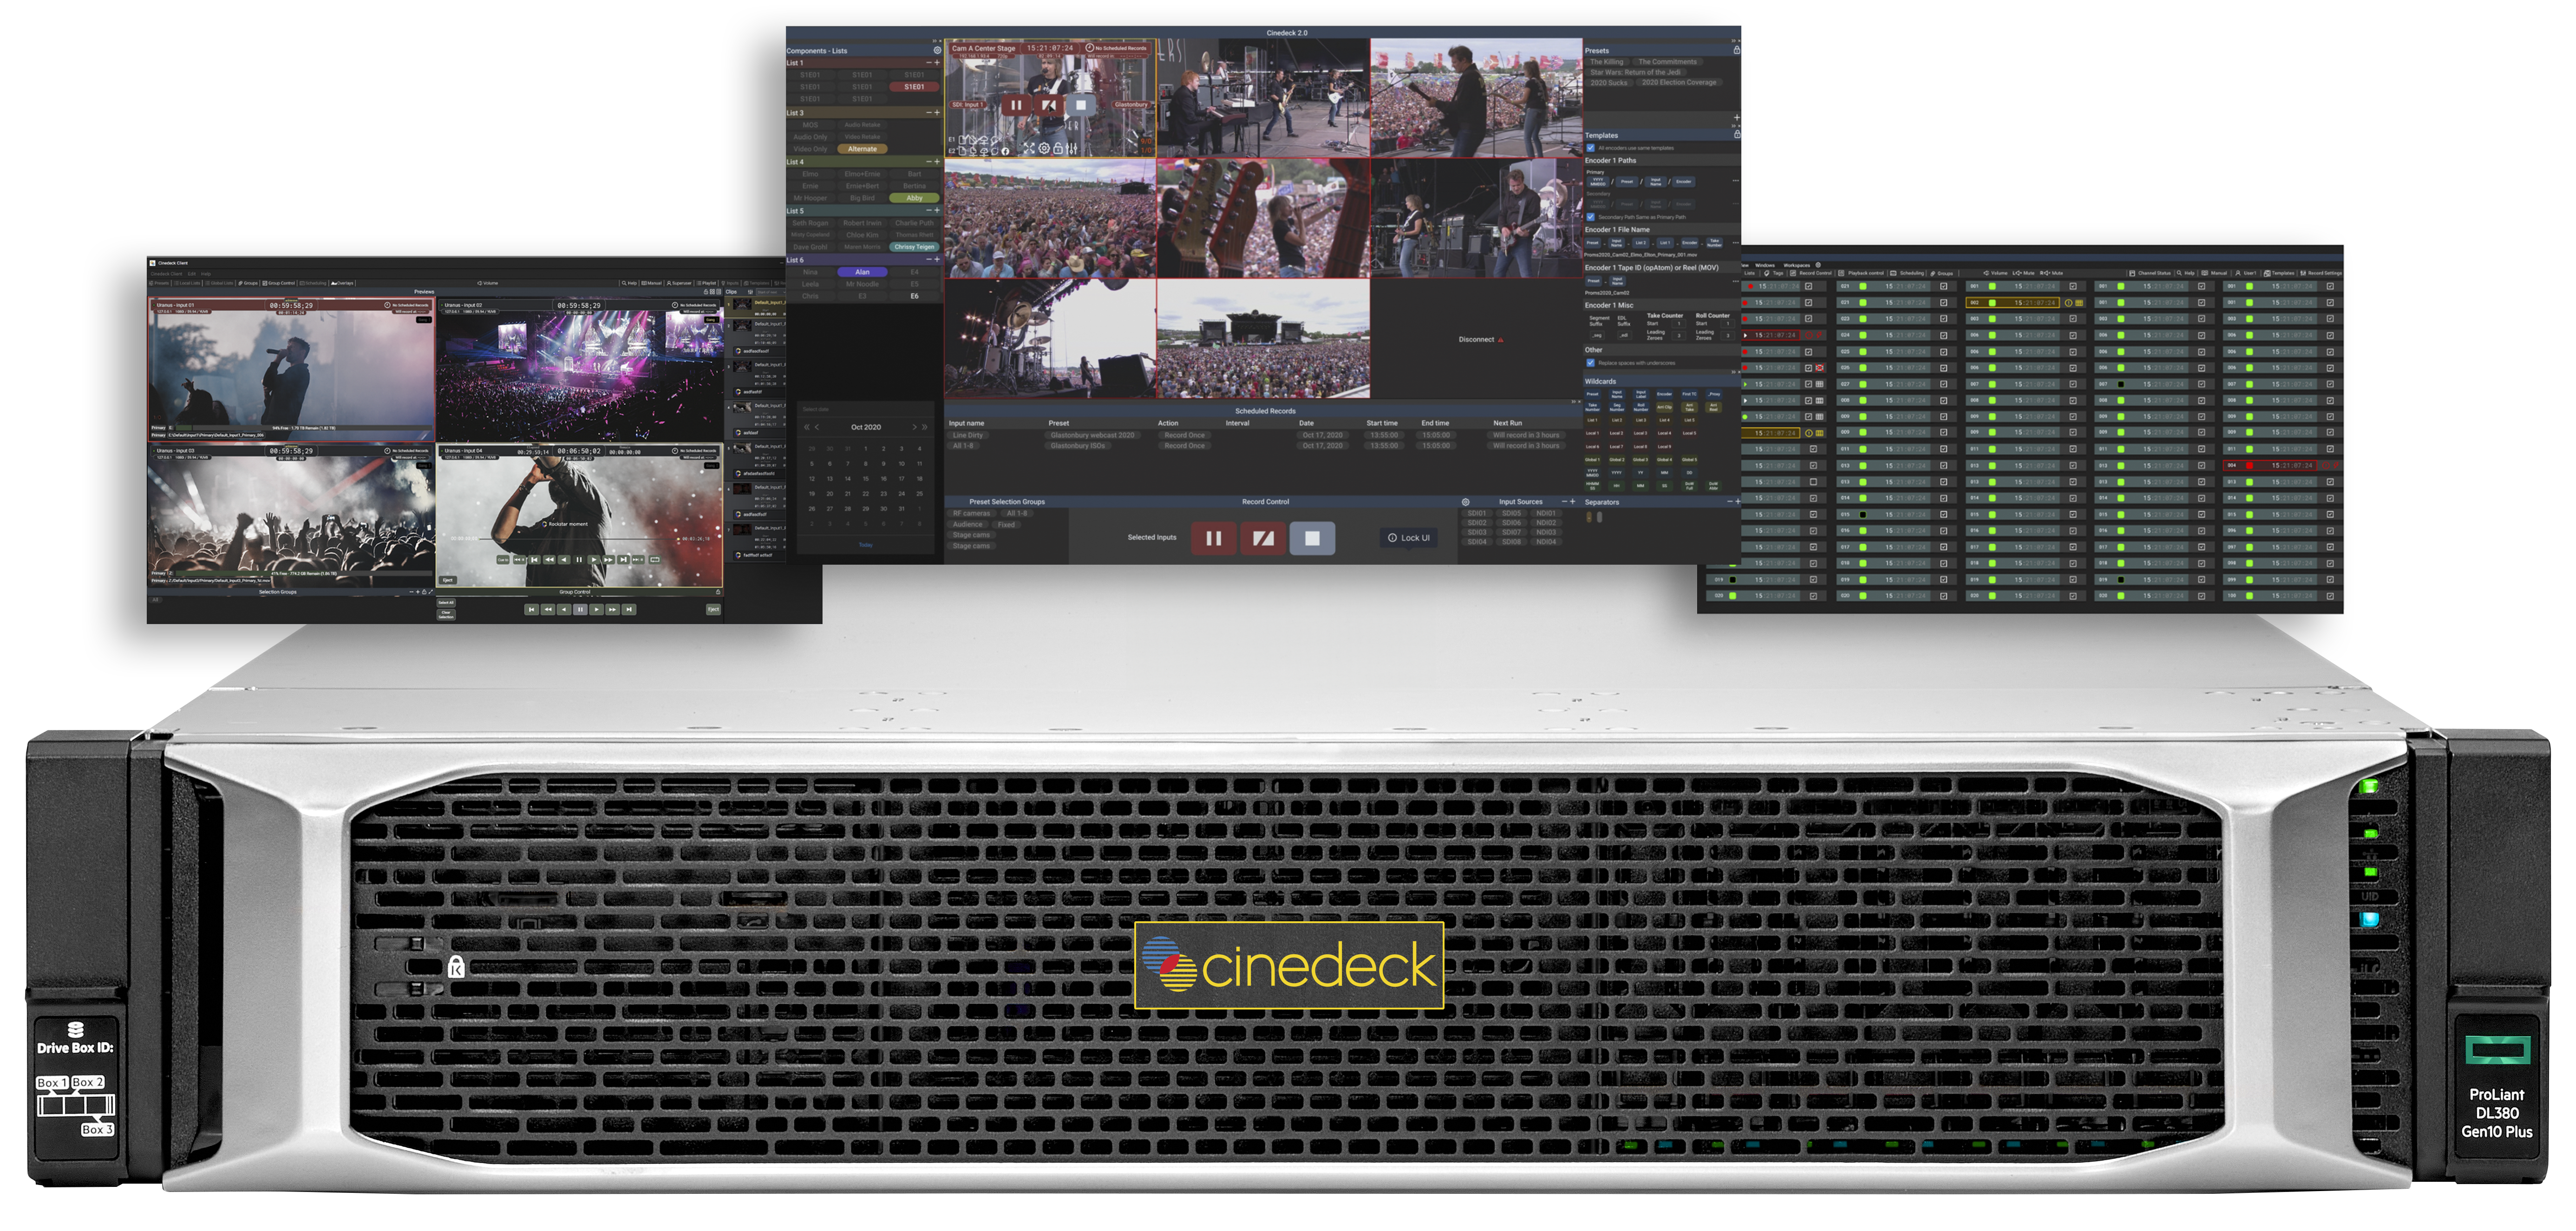
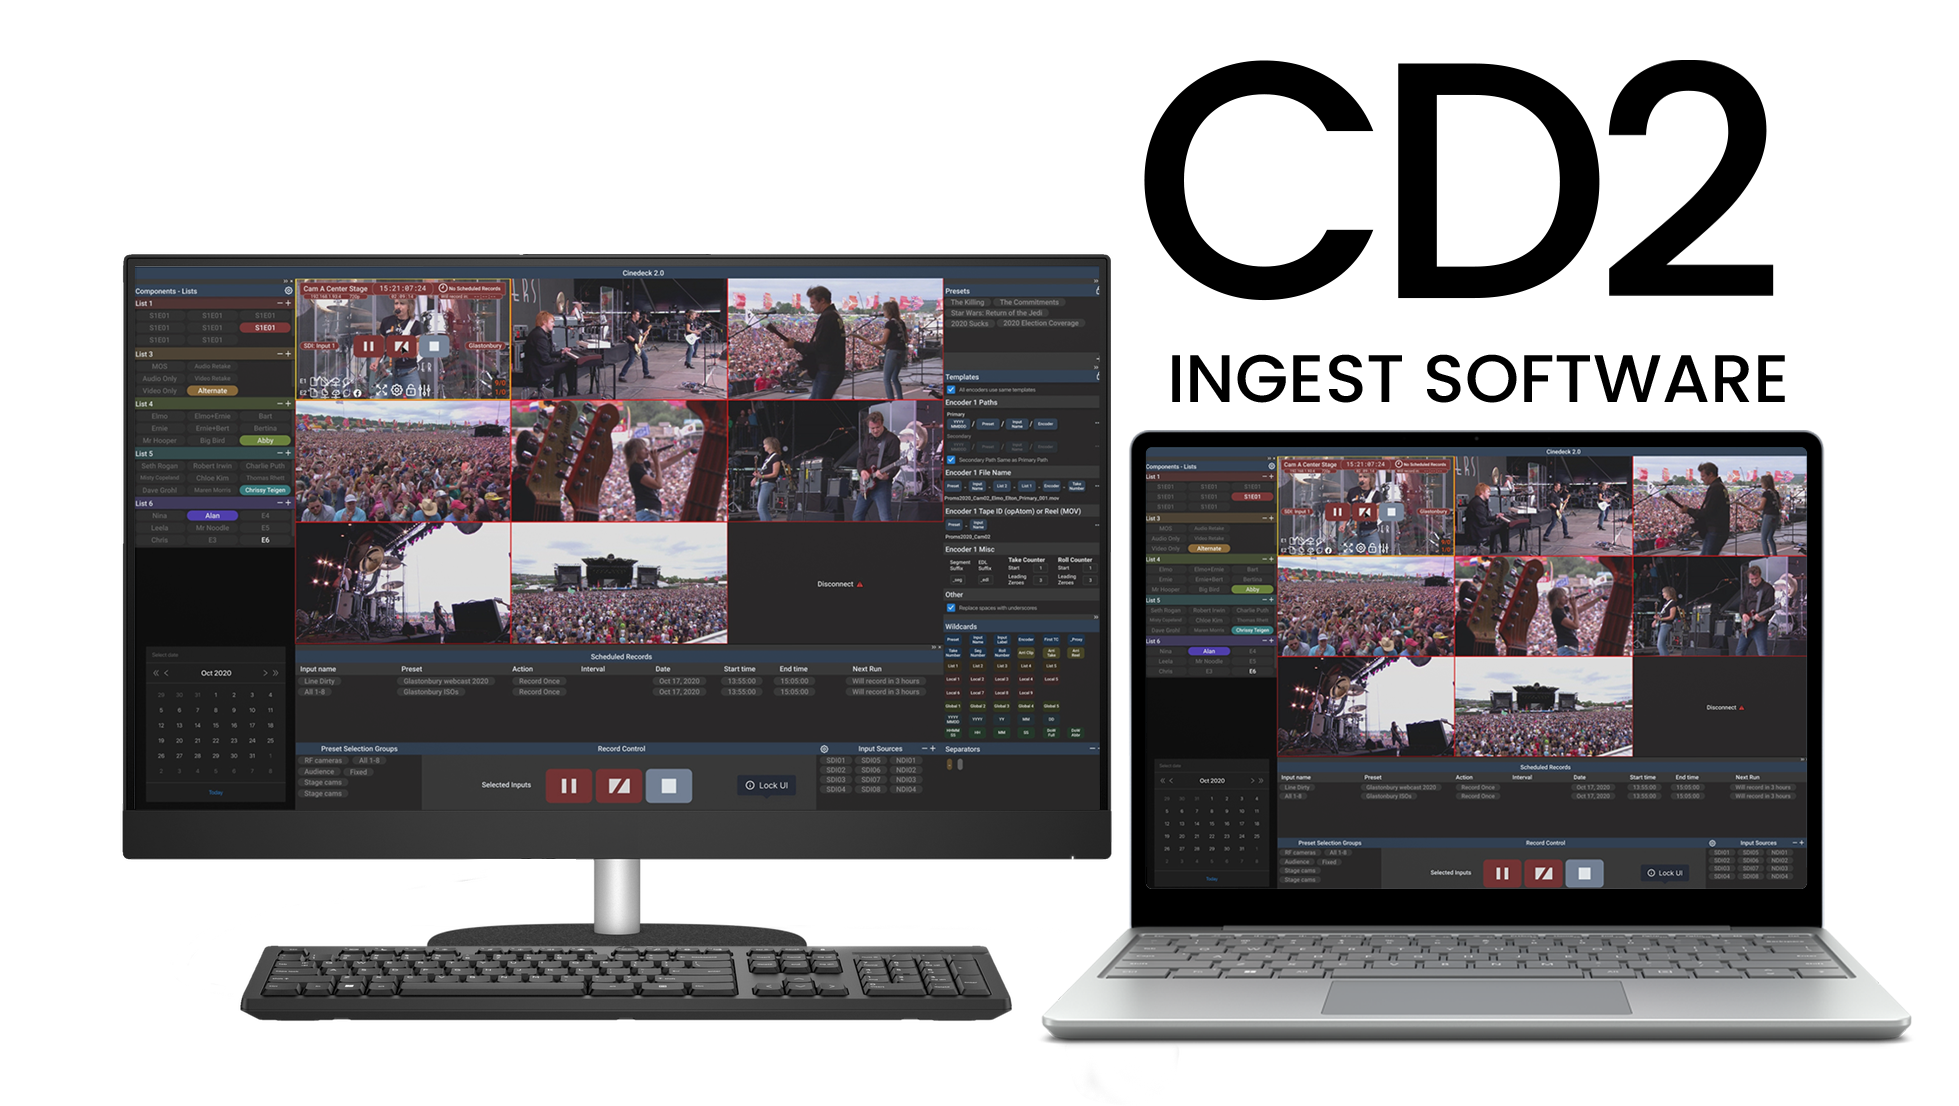
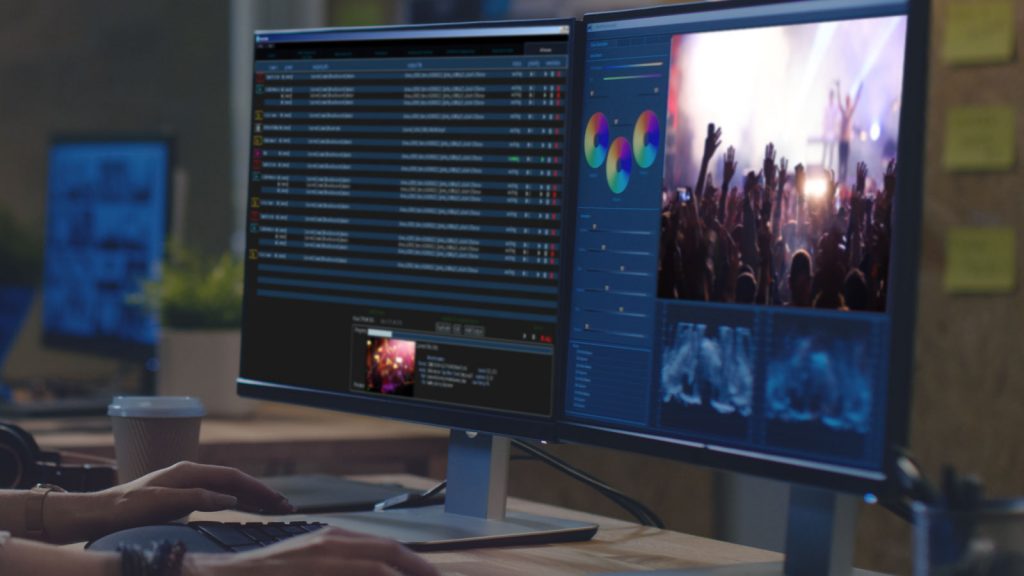
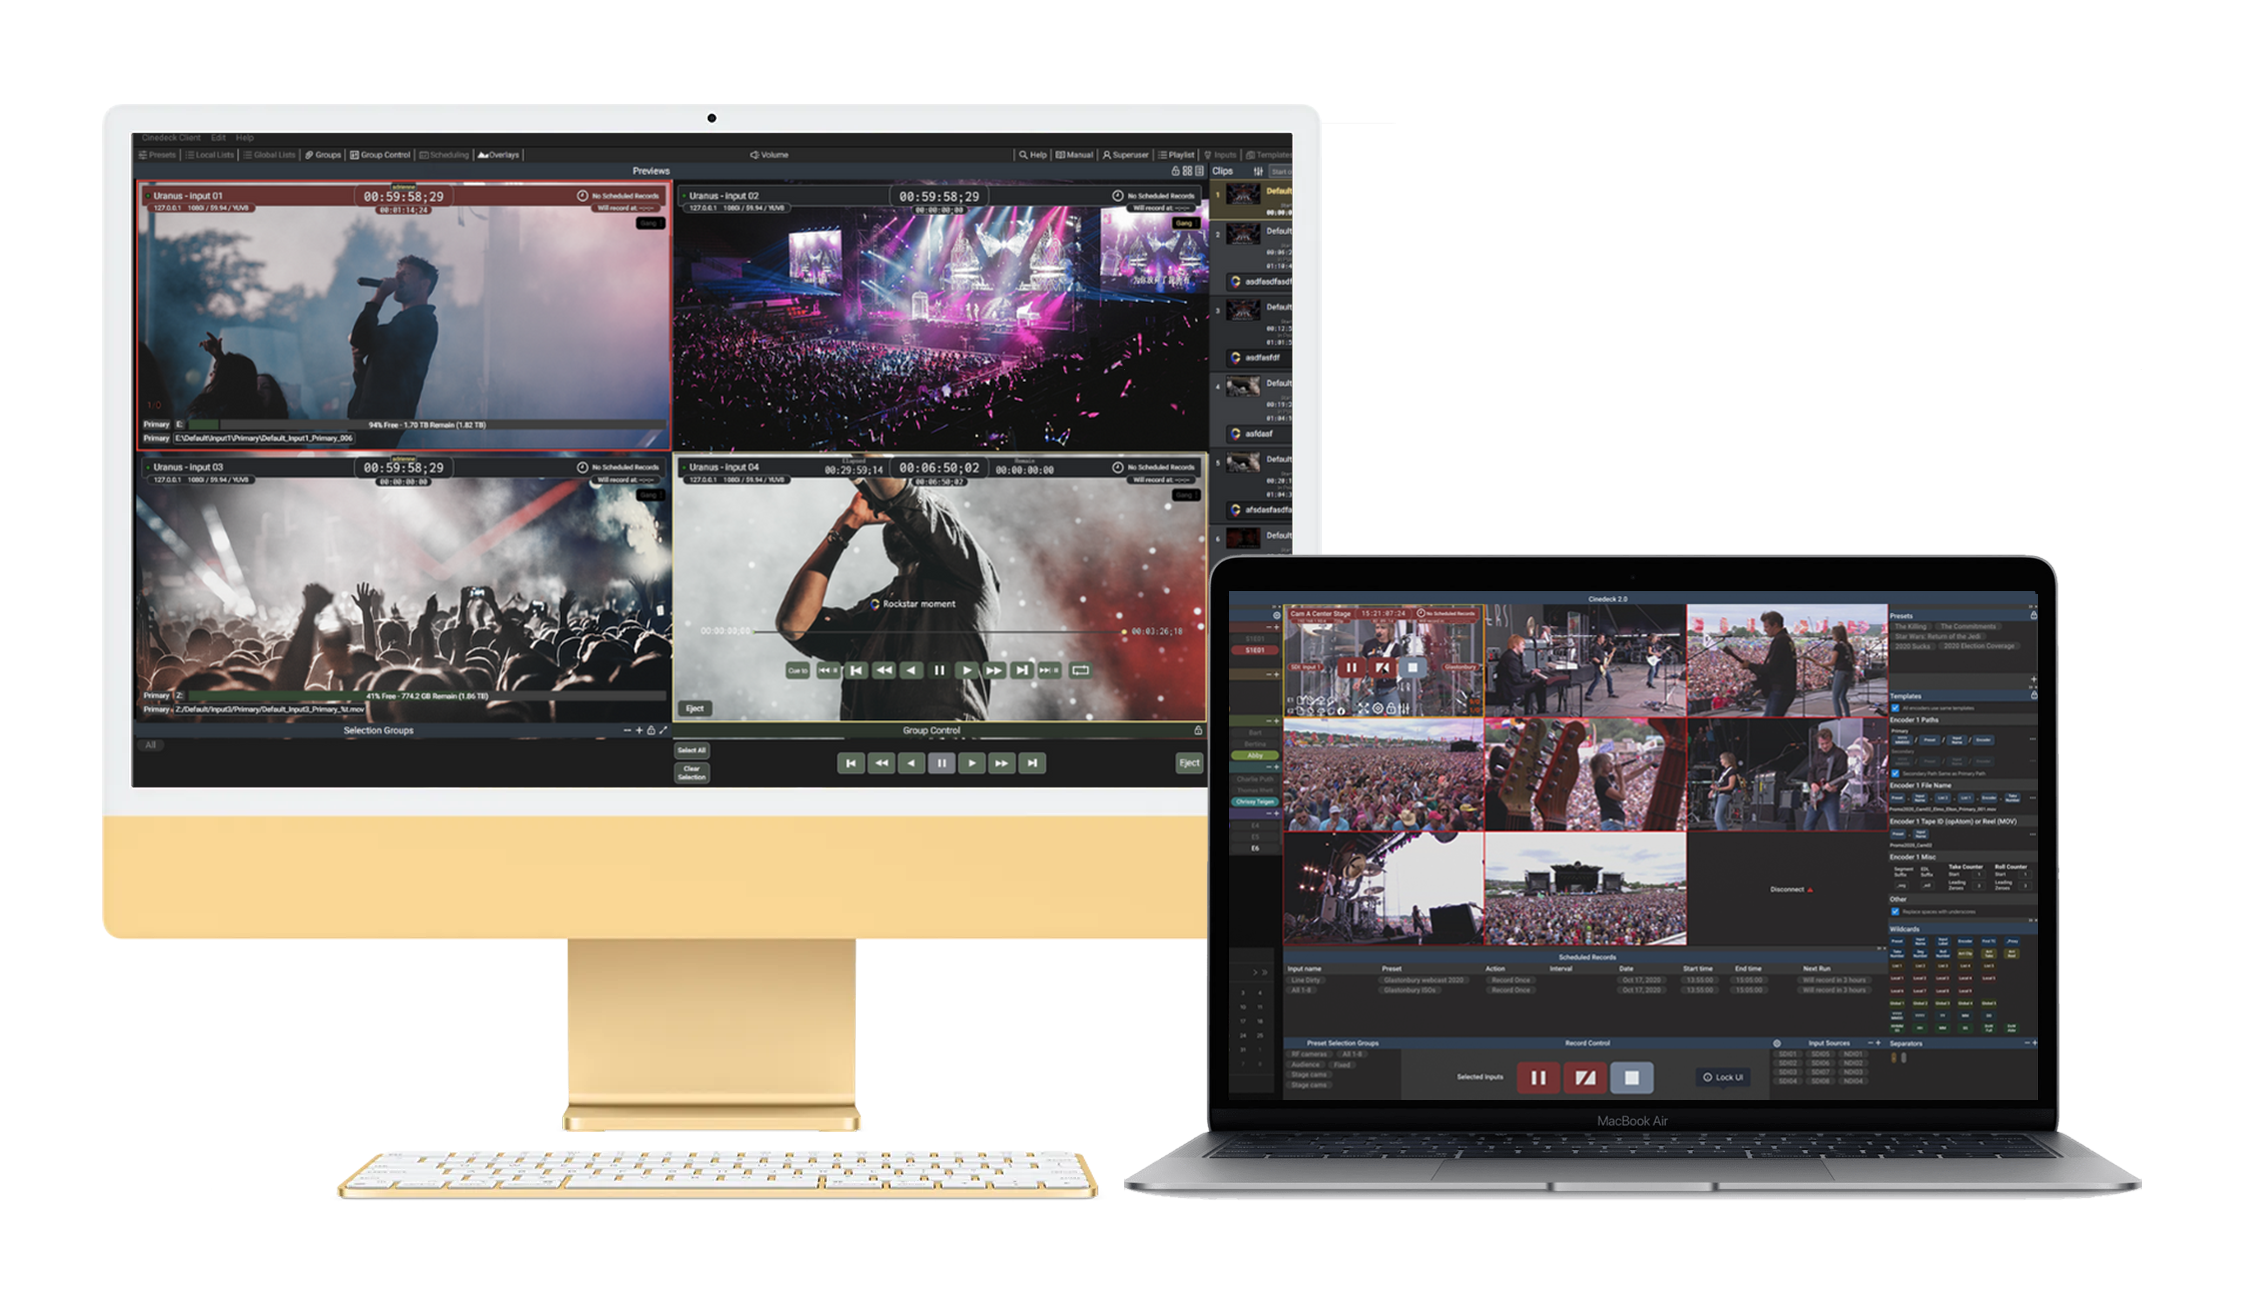
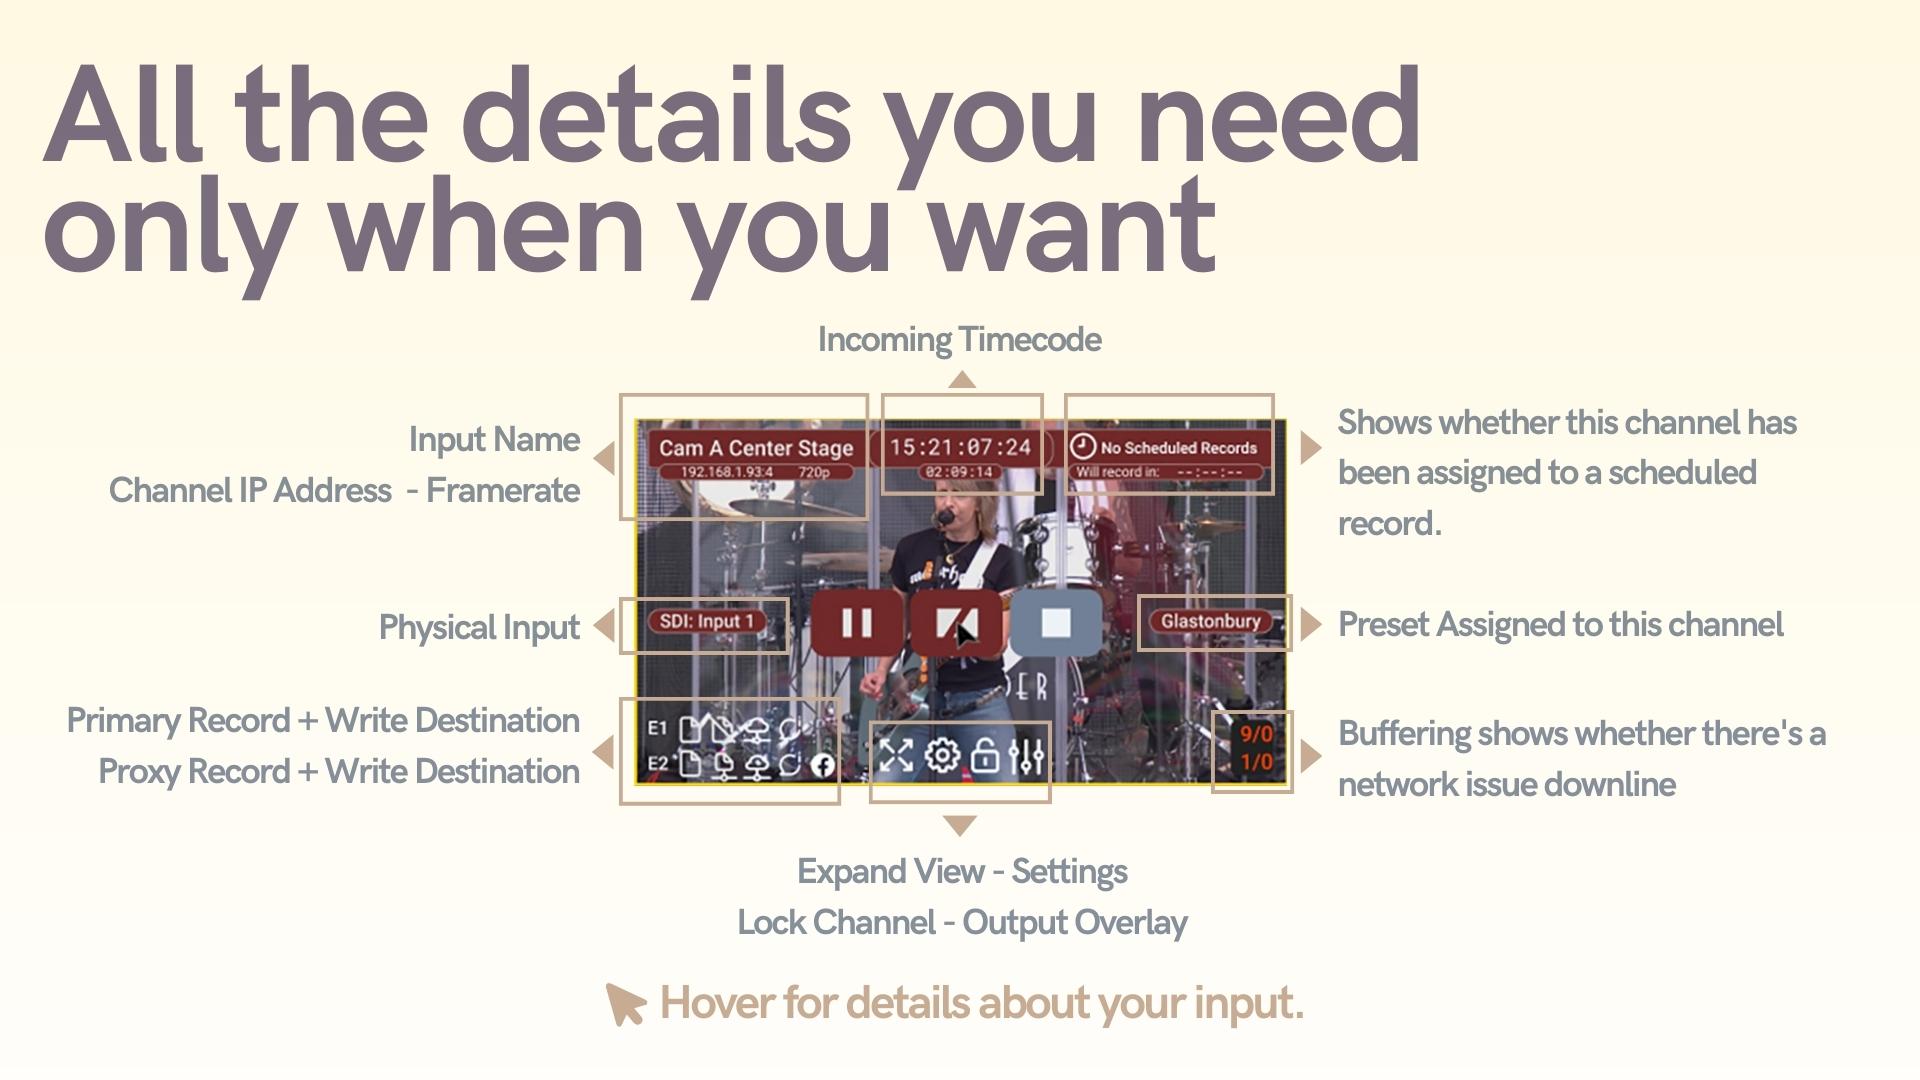
Studio & Live Event Multicam

House of Worship

Government & Research

Broadcast

Archive

User Interface

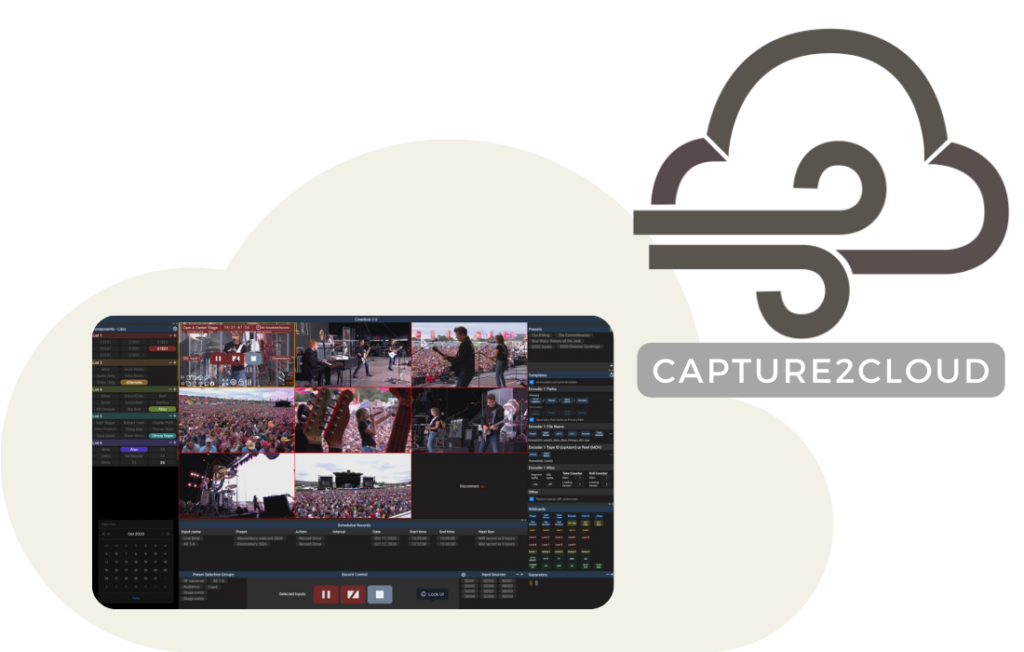
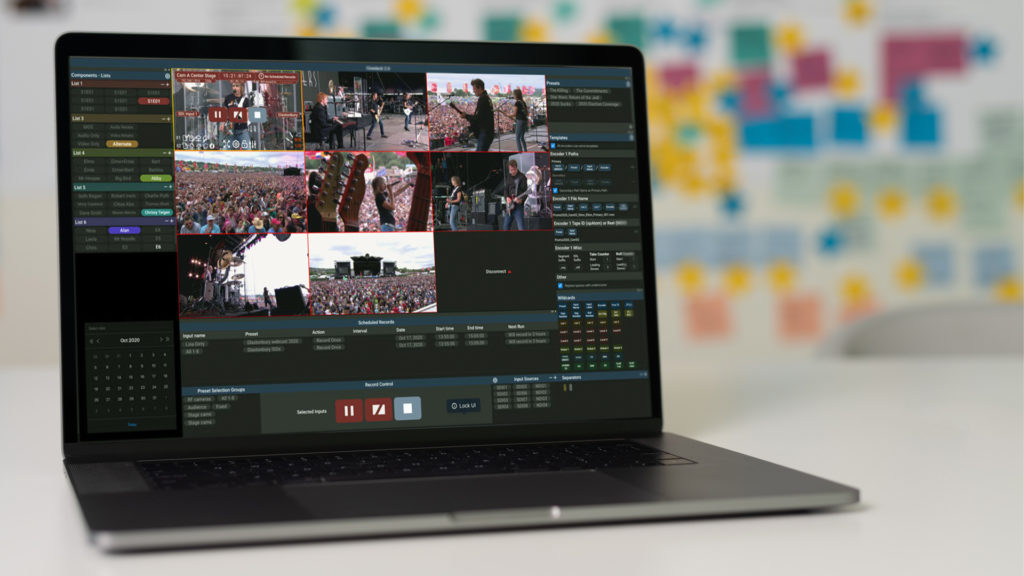
The Cinedeck Client application is a distinct software component from the Cinedeck Server, designed for control, monitoring, and review purposes. By configuring each client session with one or multiple IP addresses, you can enjoy instant monitoring on PC, Mac, and Chrome browsers. The Chrome browser deployment of the Cinedeck Client offers secure one-way browsing.

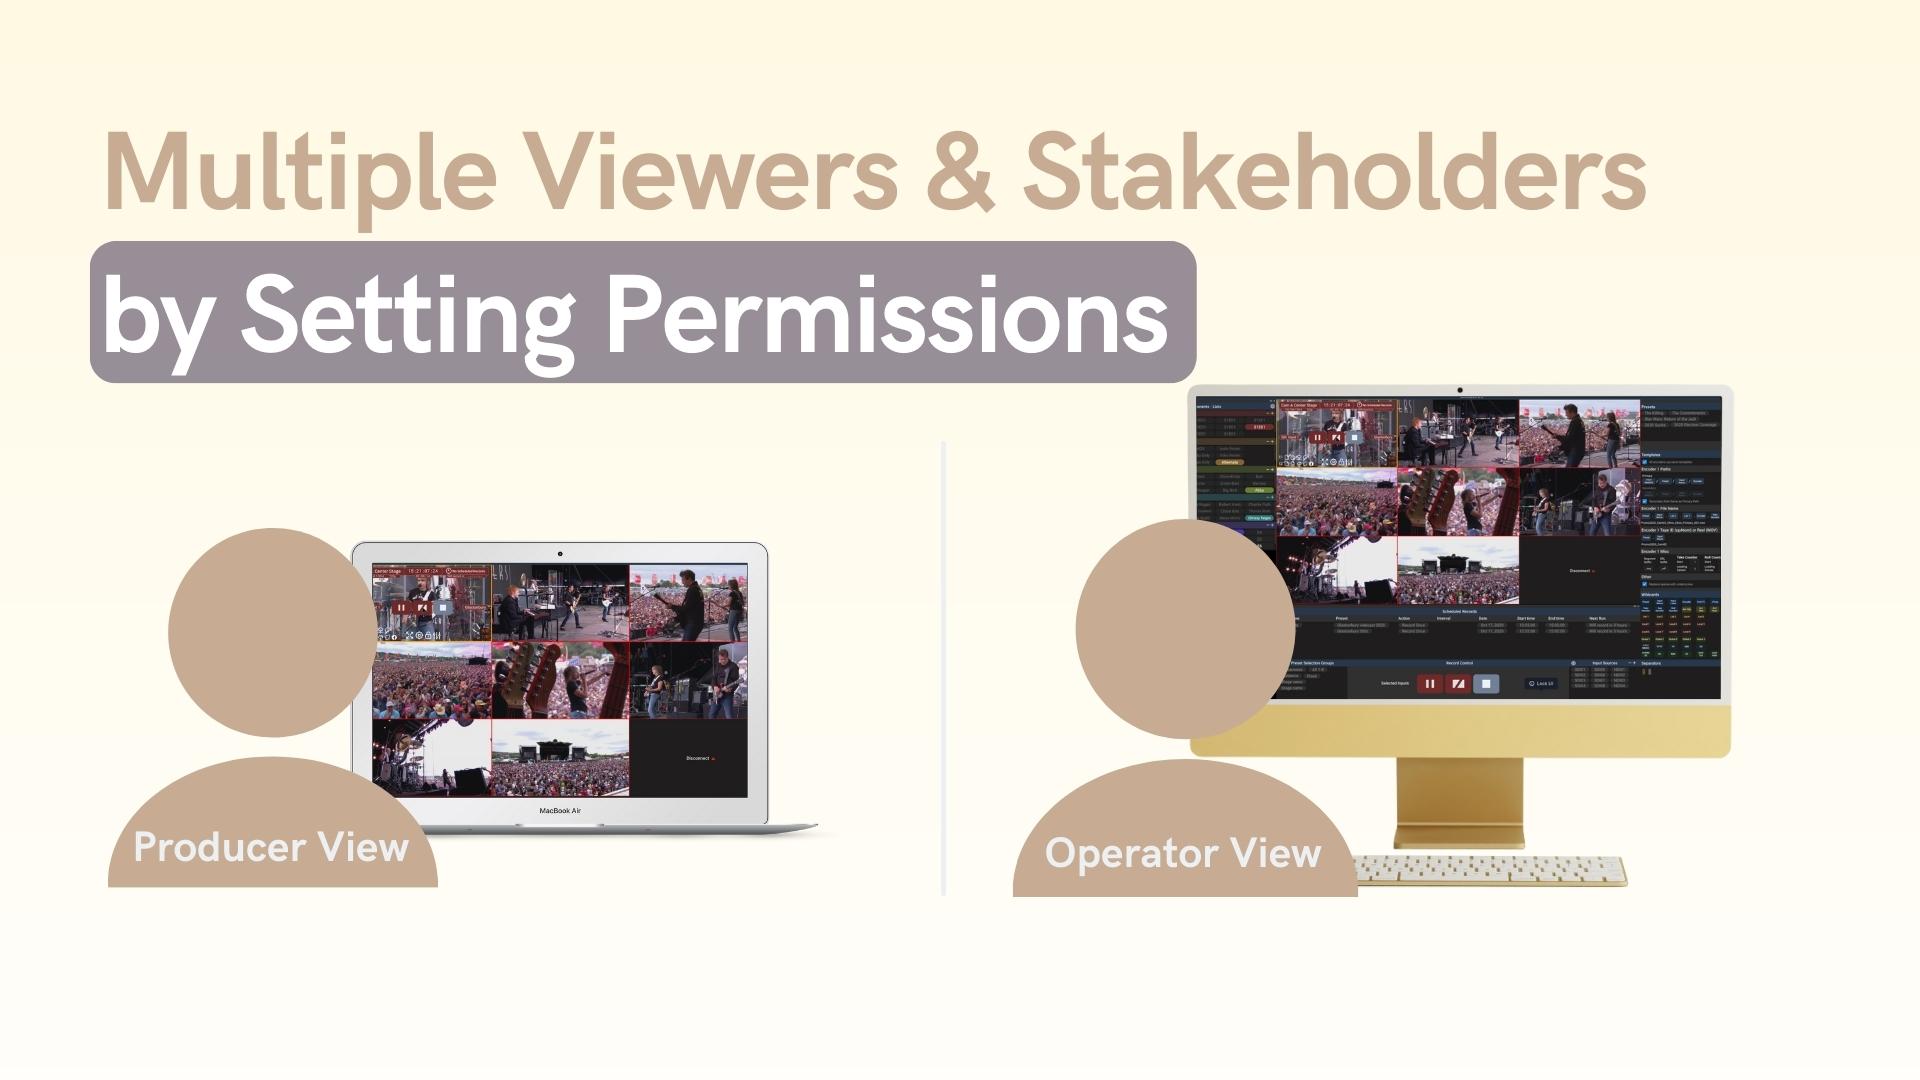
Enhance previews for your stakeholders by incorporating character overlays or timecode burns, keeping them informed about your most crucial recordings. Customize user access by defining permissions; for example, an operator may be granted record permission, while a producer could have view-only access.

Live Logging

Boost Your Post-Production Efficiency with Cinedeck

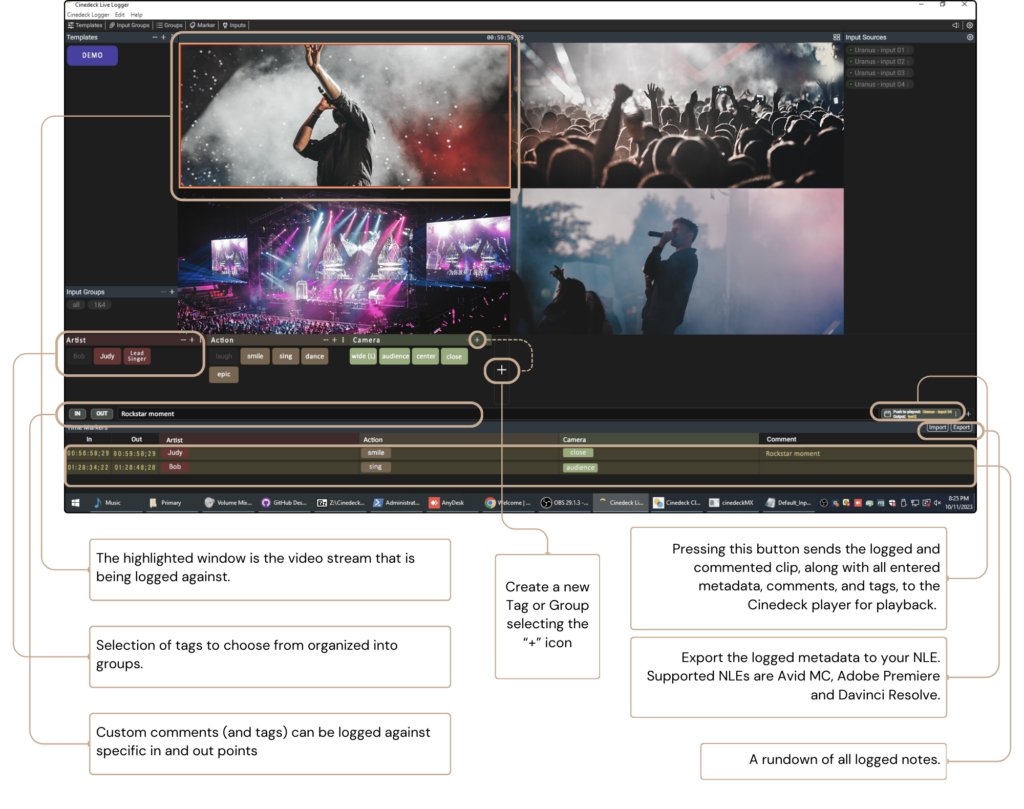
Live logging with Cinedeck servers supercharges production workflows. It facilitates real-time metadata tagging, streamlining post-production tasks. Instant access to crucial moments boosts efficiency. Annotations provide key context. Live logging with Cinedeck delivers high-quality content faster, redefining competitiveness in the media industry.

XML for live logging supported for Adobe Premiere, Avid Media Composer, Davinci Resolve, Final Cut Pro X and MAMs. 

Play Listing

Simplify, adapt, and excel with Cinedeck.

Experience complete control with Cinedeck’s playlisting application. Choose any channel for dedicated playout, tailored to your broadcasting needs, giving you a custom viewing experience. Select and reorder clips with ease from any network device, bringing flexibility and versatility to your programming. Adapt to every scenario with the ability to play out mixed framerates and codecs, ensuring smooth transitions and continuity. For utmost precision, select specific in and out points from each clip, giving you surgical control over your content. 
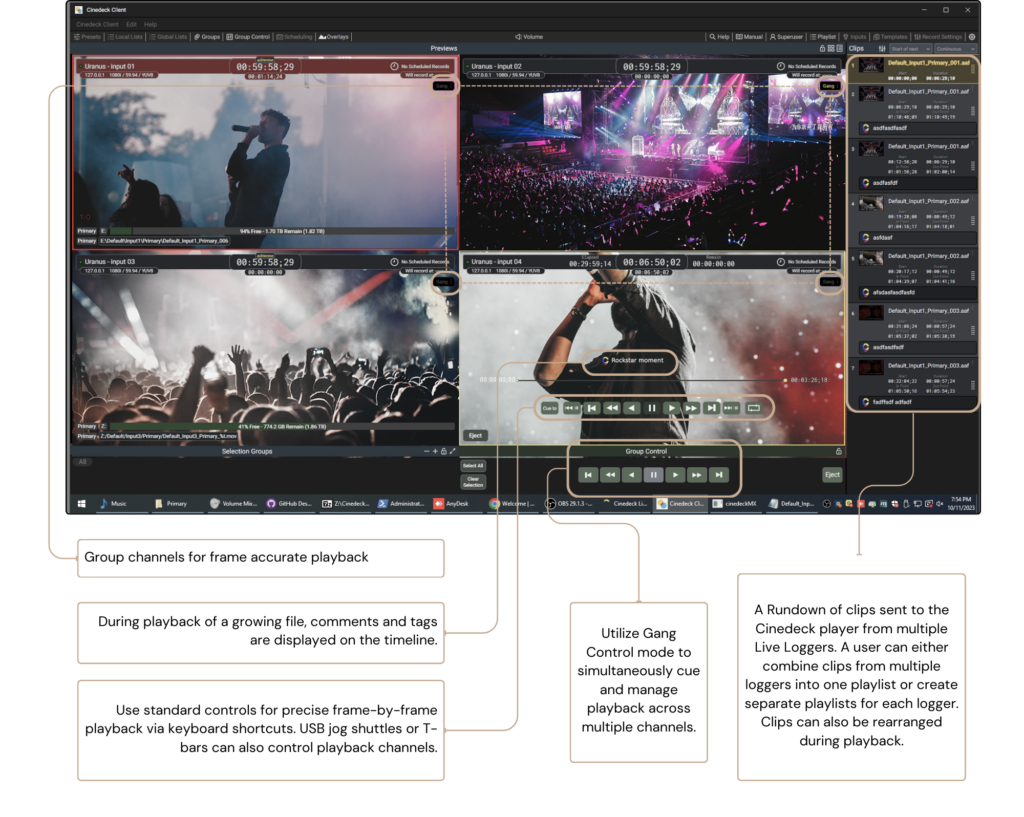
Live Replay

end to end logging, review and playback workflow

  • Simple to Use UI: Set points, send clips for immediate review, or craft highlight reels compatible with Premiere and Resolve.
  • On-the-Go Replays: Immediate playback either on-site or in the cloud.
  • Real-Time Control: Features like scrubbing and full transport control even as the clip grows.
  • Versatility: Compatible with PC, Mac, and browsers; operates both in the cloud and on-premises.
  • Efficiency with CD2: A software-only solution running on standard hardware.

CaptureGrid

redefining efficiency in multichannel encoding

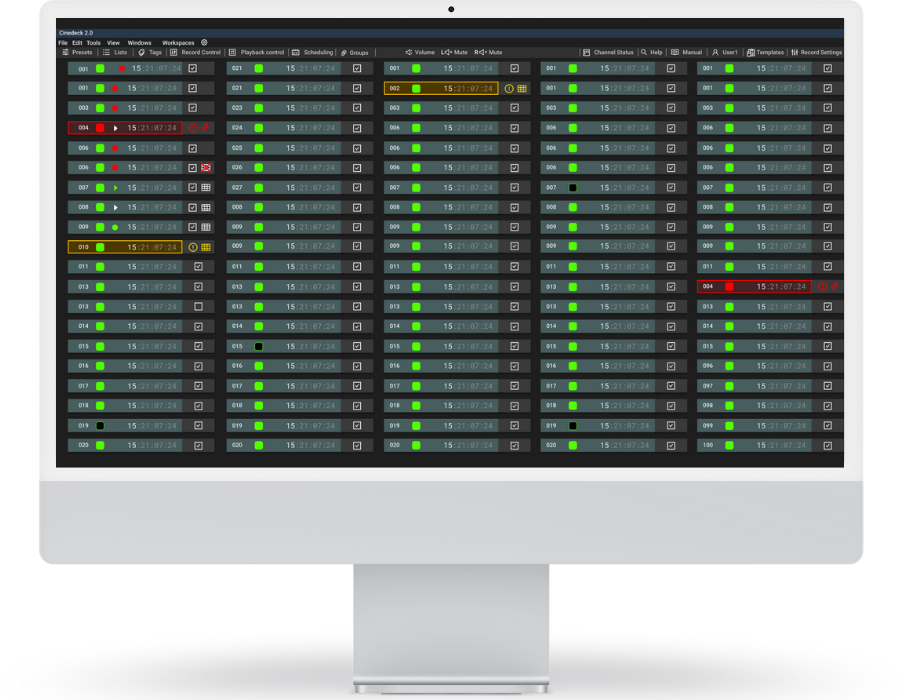
Discover seamless control with our Broadcast Control App. Specially designed for high-scale, complex multichannel productions, this tool provides comprehensive control and monitoring for up to 100 channels within a single user interface. Select and record groups of channels effortlessly, offering unparalleled flexibility in your broadcast management. Its superior technology ensures perfect frame-sync across all channels. Scale your production capabilities and maintain impeccable synchronization with this dynamic, user-friendly tool.

Schedule a Demo or Request a Trial License

Cinedeck API

Play Video

The Cinedeck 2.0 user interface is constructed upon our cutting-edge RESTful API, ensuring that all Cinedeck features and previews are equipped with a RESTful API connection.

Manage your ingest seamlessly through your MAM, or contemplate future-proofing your workflow by implementing Cinedeck 2.0 ingest in the cloud. The Cinedeck Ingest 2.0 API is accessible to all Cinedeck customers.

Blog

Cinedeck ZX2U Series: Pro and Max

Elevate Your Production Workflow

Cinedeck introduces the ZX2U Pro and ZX2U Max, engineered for media professionals who seek unparalleled encoding power and flexibility. These 2U form factor powerhouses are designed to accelerate and streamline your video production and post-production workflows, leveraging a hardware platform recognized for its dependability and performance in the industry.

ZX2u pro

The ZX2U Pro is equipped with a standard CPU, tailored for consistent performance and reliability. It’s the perfect fit for industry professionals who need a robust solution for everyday media tasks.

ZX2u MAX

For those who demand more, the ZX2U Max steps up with an upgraded CPU, offering enhanced encoding capabilities. Handle more complex tasks and larger projects with ease, thanks to its increased processing power.

Versatile Input Options for Every Need:

  • 3G Model: Supports 3G inputs for standard broadcast quality.
  • 12G Model: Offers flexibility with both 3G and 12G inputs, accommodating higher resolution and frame rates.
  • IP-2110 Card: Embraces the future with IP-2110 inputs, perfect for modern IP-based workflows.

All models are NDI and SRT ready, ensuring compatibility with a wide array of networks and protocols.

CD2 Software

Cinedeck is making affordability its latest feature

Experience the Power of Affordability

Synchronized Recording, Flexible Integration, and Exceptional Support – All at an Unbeatable Price

EASY ON YOUR POCKET
Our pricing is affordable, and our integration is flexible. No long-term commitments needed.

EFFORTLESS RECORDING
Manage multiple camera feeds synchronously with ease and accuracy, making system failures a thing of the past.

WE’VE GOT YOUR BACK
Our support team is quick and efficient. Need help? We’re here for you.

SMOOTH OPERATIONS FOR POST
We support a huge range of broadcast formats like XDCAMHD 50 with OPAtom audio tracks for a frictionless editing process and top-notch deliverables.

FILE MANAGEMENT SIMPLIFIED
With our advanced file naming, tagging and organizing recordings become a breeze. Less hassle in post-production!

READY FOR GROWTH
Our software scales with you. From UHD 4K multicam productions to large-scale live events, we’ve got you covered.

Supported Video Cards

Black Magic Design  – Matrox

Hardware Partners

Our trusted hardware partners are simplifying the process to get started with CD2. They provide vetted hardware platforms that fulfill our rigorous standards for ingest and playback.
Americas and Worldwise
Europe and Middle East

Record Edit-Ready Formats Direct to Cloud

Capture your ISO streams directly in the codec needed for editing and file delivery, or opt to record in a high-resolution, superior quality format for subsequent transcoding to meet streaming deliverable requirements.

Cinedeck Ingest offers features designed to handle encoding, scheduled ingest, and playback as you expand from a single stream to multiple ISOs.

Available on the AWS Marketplace with daily pricing, Cinedeck Cloud Ingest enables you to swiftly deploy on-demand ISO cloud ingest within minutes, powered by AWS.

Review on Amazon Marketplace

Features

Cinedeck Ingest systems support a fully customizable RESTful API that creates new interoperability for production and post-production workflows.
Selectively toggle on & off and map the destination channels of incoming audio i.e., a system could be setup to record incoming channels 1 & 2 and 7 & 8 to channels 1, 2, 3 & 4. Audio mapping will be enhanced in future versions of the system software.
Audio delay in milliseconds which can be added (per channel) to SDI, AES and Analog audio sources. Each channel can be delayed up to 999 milliseconds.
Cinedecks are capable of Avid Media Central Check-in and Edit While Capture. Depending on your system, you can have up to 8 channels for capture directly to your Media Central environment. Or, simply check-in media that was created on Cinedeck whether you are doing edit while capture, or not. While Interplay Multi-Res is also supported, Cinedeck recorders can encode H.264 files in a Interplay-friendly MXF OpAtom wrapper.
Cinedecks provide a broad selection of text metadata elements that can be burned into the video image of a file while its recording. Data selection can include any combination of user selectable timecode, system time and date, GPS coordinates*, file name, frame numbers and user defined text. The position, size and color of each element is adjustable. * GPS coordinates require the use of a Garmin model 18x GPS USB receiver
Cinedeck provide control of character out as an overlay on the user interface and the SDI video output and or as a burn-in to the encoded video with fully adjustable position, size and color.
  • Channel overlays can be independently setup with different content, character styles, sizes, positions and colors.
  • User-selectable content can be included in the different super overlays such as audio meters, timecode, file name, transport status and user defined text.
  • Secondary outputs are optional on ZX
Cinedecks support recording and playback of CC Closed Caption data with any codec wrapped as MOV or one of the MXF Op1a profiles.
Edit while capture / record is available for “QuickStart” MOV and Op1A wrappers. In Adobe Premiere, XDCamHD Op1A can be recorded to a destination which is accessible by the edit system and content can be imported, refreshed and edited while recording is still underway. Final Cut Pro growing files support depended on a discontinued plug-in. Cinedeck currently supports Edit While Capture with our Avid Interplay Support.
Each Cinedeck channel supports auto-record through the use of a simple ASCII text EDL to control the starting and stopping of recording events based on an incoming timecode. Version 4.3 enhanced EDL record with deck control providing tape transport control during auto-record from a VTR. Included in the Cinedeck interface is an EDL editor for creating and modifying EDLs for each channel. Additionally, Cinedecks running the latest 4.3 version or later support importing CMX 3600 EDLs.
Cinedecks allow the user to easily gang together two or more internal channels from the user interface for simultaneously triggering record and/or playback. To reduce the strain on spinning disc file systems, Cinedeck also support a user defined staggered gang, allowing channels to be triggered sequentially with a specified time delay instead of simultaneously.
Simple, replacement of video and or audio in an existing file, similar to a traditional tape-to-tape insert edit, can be done with ProRes, DNxHD, AVC-Intra, JPEG 2000 and XDCAM HD content wrapped as MXF OpAtom, Op1a or MOV files. Inserts can be performed directly from non-linear editors such as Avid Media Composer and Final Cut Pro, using the same procedures as if editing to tape. Directly on the Cinedeck, users can insert a live source into a file or perform frame accurate inserts of one file into another. All of these processes will often be more efficient than recreating the entire original destination file. Additionally, pre-striped or blacked files (Cinedeck VMM – Virtual Mastering Media), can be created in advance and used as an insert edit destination for recording or editing in a non-linear fashion. These black files can be recorded into while providing full random play access on another Cinedeck channel or they can be played with a third-party viewers such as QuickTime or VLC Media Player. All Cinedeck files, including pre-striped black files, can support up to 32 channels of audio.
Cinedeck ZX85 supports SMPTE2022 and 2110 IP. There are 3 SFPs and 2x 3G SDI as opposed to 8x SDI. Enduser must advise at time of purchase that they would like the IP Card vs the Standard SDI card.
  • Eg: ProRes HD up to 60p: 3in / out over SFP + 1 in/out over SDI
  • Eg: XAVC-I 4K up to 60p with XAVC/AVC Expander: 1in / 1 HD down res output
Cinedeck recorders can accept an external IRIG-B timecode input and display the data on screen and optionally burn the data into the recorded video while recording the data with the incoming source.
ZX can record all (2K-HD-SD) inputs with the users’ choice of available master and proxy codec (for example ProRes HQ  and ProRes proxy or uncompressed with H.264 proxy) while RX can record two sources with a user selected master and H.264 proxy codec.
All Cinedeck systems support NDI for record and playback.
Playout While Record is achieved by leveraging a preallocated file space or blacked-file. A file with the users selection of format, codec, duration, etc., is created and then recording is done by inserting the needed video and audio into the file. Playback of the file is completely flexible in that any portion can be accessed at any time.

Each Cinedeck  input can be written as master and proxy file(s) and the decks can write redundant files per input/encoder to multiple destinations, providing the media and connection support the selected bit rate and I/O needs.

For example, a 4 channel system can write a ProRes master and proxy file for each input giving you four primary masters and four primary proxies.

Activating redundant record can provide up to four additional or secondary masters and four secondary proxies for a total of
sixteen files. Redundant recording can be set on a per-encoder basis.

Cinedecks provide many options for remote control; All decks allow independent RS422 control of each channel.

  • Each channel be the master or slave in a RS422 relationship, allowing control in either direction.
  • With Cinedeck as master over a tape machine, the user is presented with a full array of controls and status indicators from the slave deck. Recordings can be made on either machine, i.e. using the Cinedeck as the source or as the recorder.
  • As slave, a Cinedeck can be controlled from a partner machine or via a separate control panel.
  • Cinedecks utilize the Grass Valley AMP protocol for control over IP by external devices such as asset management systems
    and switchers.
  • VDCP is supported on decks running version 4.5 and newer.
  •  Up to 12 channels of RX and or MX can be simultaneously managed using the IP (AMP protocol) based Cinedeck MCC,
    multi-machine control interface. 

All Cinedecks support ‘roll-over’ recording where two media (identical or dissimilar) can be designated and combined as ‘primary’ and ‘secondary’ record destinations, significantly increasing record time.

If the Cinedeck API is not being used, the Cinedeck Multi-channel Control App can be used for simple scheduling.

Additional scheduling for unattended activation on a channel by channel basis can be performed using the EDL function.

Segment Record, also known as user-defined ‘chunking’, allows long recordings to be split into clip segments of shorter duration.
During recording, each time the user specified duration is reached or the manual ‘break’ button is pressed, the current file is closed and the next segment file begins. Previous segments can be fully-accessed for playing and copying, etc.

Additionally, breaking large recordings into smaller pieces allows content to be easily transferred to storage with file size limits such as DVDs or FAT32 drives. Each segment is automatically sequentially numbered.

All Cinedecks write video and audio recordings as files to low cost and commonly available non-proprietary 2.5” SSD SATA drives.

  • Cinedeck SSD drives are mounted in removable, hot-swappable, dual drive cartridges or ‘sleds’. (RX and newer)
  • Additional sleds as well as portable and installable receiving chassis are available to enable easy ‘sneaker-net’ workflows.
  • Currently, Cinedeck only recommend and support Samsung Pro and EVO series SSD drives. All sizes are
    supported.
  • For recording and playback, all Cinedecks can also utilize network storage including NAS (network attached storage) and SAN (storage area network) systems requiring client software. Additionally, the Cinedeck operating system can be setup to support iSCSI file systems.
  • Cinedecks are Windows 10 Embedded based so fully support SMB shares and client software is often available for SAN installations.
    o Cinedeck ZX and RX have an available PCIe slot for 8Gb, 10Gb or 16Gb network cards as well as direct attached storage.

Cinedeck provide internally generated timecode, can accept embedded SDI timecode or external ‘LTC’ and display the data on screen and optionally burn the data into the video of selected files while recording the data with the incoming source. IRIG-B timecode is also supported.

IRIG support is optional on RX & ZX, Per channel pair timecode input is standard on ZX, Master timecode input is optional on ZX.

Each recording session can be accompanied by clip specific *.xml files. The completed *.xml files contain clip specific metadata which can be imported into asset managements systems and the like. The destination folder can also be selected for the xml files.

FAQ

Log4J Statement

Cinedeck does not use Java in any part of our software so this issue has no bearing on any Cinedeck product. We can confirm that we do not Java technology of any kind.

MEDIA OPTIONS AND ACCESSORIES

Accessories are available for purchase through Cinedeck directly or your local authorized Cinedeck reseller. Other items are standard off-the-shelf items available from resellers worldwide.

Cinedeck only recommends and supports Samsung SSD Drives for internal recording media, specifically:

Samsung Pro series (highest performance, longest warranty)
Samsung EVO (best Price/capacity)

Each Cinedeck comes with one or more standard drive carriers which hold up to 2 SSDs each.

  • Item #15001*: Each Cinedeck system comes with these drive carriers. Additional drive carriers may be purchased as required. RX2 Ships with one standard SSD carrier ZX20 Ship with two standard SSD carriers ZX40, and ZX45 Ship with four standard SSD carriers.
  • Item #15003*: These optional single drive carriers with built-in USB-3 port fit in the same chassis as the standard dual-drive carriers so can be used interchangeably with standard carriers.

Only one SSD can be enclosed in the USB-3 carrier. Note; It is not possible to simultaneously connect the USB while the drive carrier is installed and active in a chassis.

  • Item# 15005*: Internal receiving chassis – Designed to accept Cinedeck drive carriers and fit a standard 3.5” drive bay in a typical PC workstation. Requires two SATA connections and a power connection.
  • Item #15004*: Drive carrier and internal chassis set – Includes the chassis plus a drive carrier.

While the list continues to grow, the above list are some NAS and SAN solution manufacturers whose products are known to be used with Cinedeck products.

Item # 11004*: ZX Rack Kit

Rack rails are for 19″ standard chassis or Cabinet and come with 2 mounting ear and screw sets. Slide rails are extensible up to 33″.

At this time, rack mount kits are not available for the RX2

All RX2 decks come with a built-in touchscreen and video preview display while the same touch display is optional for installation at the left front of ZX. 

REMOTE AND CONTROL OPTIONS

Cinedeck provide multiple pathways for remote access and control including RS-422 and USB, allowing the use of an array of off-the-shelf control panels. Additionally, ZX can be optionally equipped with a surface mounted jog shuttle. Ethernet based control is available via the AMP and VDCP protocols. 

At the most basic level, each Cinedeck channel has a bi-directional RS-422 port, accessible to devices such as those from DNF that typically run a BVW or SRW deck. Each Cinedeck channel can fully replace a traditional RS-422 controlled VTR, also for tasks such as Digital Cut from an Avid. In addition, Cinedeck channels can be controlled via VDCP over RS-422.

Third party RS-422 controllers include:

  • DNF ST100 and ST400
  • Controllers by JLCooper
  • Controllers by Lance Design

That same RS-422 port is reversible, allowing the Cinedeck to control an attached device such as a VTR using BVW or SRW commands.

Cinedecks support AMP, Grass Valley’s control API over Ethernet.

AMP provides hooks for full setup and operational access and is the path for custom asset management system integration or other deeper system incorporation. AMP is also the API used by the Cinedeck multi-channel control application for controlling multiple channels across several Cinedecks.

Many facilities control their Cinedecks utilizing one of the many VNC applications. Cinedeck’s development and support teams access decks every day using TeamViewer and many customers employ TeamViewer as well as open source control packages such as Tight VNC and Real VNC.

All Cinedecks support standard USB control devices. A USB keyboard and mouse are recommended for basic setup and operation in many environments and control panels such as those from JL Cooper, Contour Design and P.I. Engineering can optionally be used.

In addition, Cinedeck ZX can have a Jog/Shuttle installed on the right front panel for a VTR like installation. Third party USB controllers include:

  • X-Keys Jog-Shuttle XK-12 controller by PI Engineering (www.xkeys.com)
  • Shuttle Xpress and ShuttlePro V2 by Contour Designs (www.contour-designs.com)
  • Logitech R800 remote (www.logitech.com)

Directly related to USB are KVM systems and indeed, Cinedecks are connected to KVMs in many facilities. Generally, HDMI is the most appropriate for the display connection but some current decks also have Display Port and or DVI while VGA is available on some older models. The KVM system must provide DDM (Dynamic Device Mapping) which maintains the connection to all connected devices, regardless of the active device.

Sign up for access to our RESTful API here.

TECHNICAL QUESTIONS

Cinedeck currently supports all models of Samsung Drives, specifically:

  • Samsung 840 Pro series (excellent price/capacity)
  • Samsung 850 Pro series (highest performance, longest warranty)
  • Samsung 840 OR 850 EVO (best price/capacity)

You may use other SSDs with your Cinedeck recorders. However, we may not be able to provide technical support should you have any issues due to non-approved SSDs.

The Cinedeck development team can absolutely confirm that not all SSDs are created equal. SSD specifications advertised by manufacturers can be very misleading.

Real-time video recording, especially multistream, is unlike any other use-case for SSDs.

In general, most SSD drives are not optimized for best performance in this specific case. Also, some drives have extremely high failure rates.

For instance, once Cinedeck had drives provided from a manufacturer for testing. They had a 100% failure rate within 6 months.

This does not mean they all completely stopped working. But, they could no longer reliably record video.

Don’t skimp on drives to save a few cents. It has a poor cost-benefit ratio. Especially, when you have to record an extremely costly production.

We also advise you to always make a backup recording. Even if it’s just to the in-camera recording card.

Most issues that arise during recording are media related. All the actions below can affect the state and performance of drives as well as negatively impact recording:

  • improper formatting
  • incorrect file system or cache settings
  • use of drives on other file systems before recording (e.g. offloading media on a Mac)
  • formatting on a system other than Windows 7
  • improper removal of the drives after recording

To avoid these issues, we only recommend using Samsung SSDs.  For them, Windows disk-caching settings must be set to “on.”

In addition, local SSD disks must be:

  • MBR volumes, partitioned on a Windows 7 or a newer system.
  • Formatted as NTFS or exFAT*
  • Formatted as a single volume
  • Freshly formatted before recording (especially if used with another system such as a Mac, or if improperly removed)

* You should only use exFAT if you need to mount the drives on a Mac OS machine for offload. However, we strongly advise you to install NTFS read and possibly write capability.

If you are a Mac user, don’t panic. The Windows Explorer is very similar to Mac Finder. They both do exactly the same thing. The Windows Disk Management Console is similar to the Mac Disk Utility. They too do the same thing.

The only real difference is the appearance.

You can find more information on using your SSDs with Cinedeck in the Cinedeck User Manuals.

No, Cinedecks are primarily SOLID STATE recorders; recording should always be to Solid State Drives (SSDs) mounted in the internal removable drive bays. Currently Cinedeck supports the Samsung 860 Pro and EVO SSD drives.  

We very strongly recommend that you do not use USB or eSATA drives based on spinning-disks including “Hybrid drives”. These devices are unsupported and their use is not covered by support. 

USB and eSATA are available for media offload but due to the vast number of variables involved in different mechanical hard drives and external enclosures, Cinedeck does not recommend or support recording to these external drives.  

While DAS and network devices are routinely used and are an approved workflow, Cinedeck cannot in any way guarantee that performance of any particular recording media or network device (including SANs, external RAID arrays, etc.), will be adequate to support the number of record channels directed to them.

It is up to the end user to understand the risks and to have the technical expertise on hand to properly take advantage of recording media other than the internal SSDs, including tuning networks and storage devices for appropriate performance.

Cinedeck systems support cameras and video sources that output via 1.5 and 3G HDSDI. 4K is supported as Quad HD or Quad 2K. Earlier Cinedeck models also support HDMI, or LAN.

Supported cameras include but are not limited to the following:

  • ARRI – D-21/ALEXA/ALEXA PLUS (HD only) & ARRI RAW
  • CANON – XLH1S, XF305, C300, C500
  • CINEFLEX V14 HD
  • HITACHI – SK-HD200
  • PANASONIC – HPX3700, AF100
  • PANAVISION – Genesis
  • PHANTOM – Flex, HD Gold
  • RED – ONE (720p tap for on-set monitoring), EPIC, SCARLET-X(HD ONLY)
  • SONY – F1500, F950, F900, EX1R, EX320, F23, F35, FS100,
  • PVM- 320, PMW-35, PMW-F3 (including S-LOG option), F5, F55 (YUV 10 4K)
  • WEISSCAM – HS2 (HD only)

You can use hardware and software RS422 controllers via Sony or VDCP protocols. We have tested the following, but the list is not definite:

Hardware RS422:

  • Hi-tech (Sony and VDCP over RS422)
  • DNF (Sony)
  • BUF (Sony)
  • JL Cooper (Sony)
  • most Sony VTRs
  • Spirit telecine control (Sony)
  • Ross switchers (VDCP over IP or RS422)

Software RS422

  • Media Composer (Sony)
  • Final Cut (Sony)
  • Clipster/Venice (Sony)

Cinedecks support a broad variety of H.264 profiles in various resolutions and qualities. The following is just a subset. We are always adding to the list.

If you require a profile that is not available in your system, contact support to request the dev team to add it.

Our dev team will need all the specifications and preferably also a sample file. Make sure that it matches your requirements and works in your environment.

HD Master

  • IPOD 16×9 320×180 VBR (max 350kbps)
  • IPAD 16×9 640×360 VBR (max 900kbps)
  • DAX (Dailies) 640×360 VBR (MAX 700kbps)
  • DAX_2800 (Dailies) 640×360 VBR (MAX 2800kbps)
  • NatGeo 16×9 576×360 VBR (max 350kbps)
  • Main Proxy 16×9 960×540 VBR (max 350kbps)
  • PIX (Dailies) 1280×720 VBR (max 2800kbps)
  • Full HD 16×9 1920×1080 VBR (Max 3000kbps)

SD Master

  • FULL_SD 4×3 NTSC/PAL VBR (MAX 700kbps)
  • FULL_SD_2800 4×3 NTSC/PAL VBR (MAX 2800kbps)
  • FULL_SD Anamorphic 16×9 NTSC/PAL VBR (max 700kbps)
  • FULL_SD_2800 Anamorphic 16×9 NTSC/PAL VBR (max 700kbps)

HD Proxy

  • IPOD 16×9 320×180 VBR (max 350kbps)
  • IPAD 16×9 640×360 VBR (max 900kbps)
  • DAX (Dailies) 640×360 VBR (MAX 700kbps)
  • NatGeo 16×9 576×360 VBR (max 350kbps)
  • Main Proxy 16×9 960×540 VBR (max 350kbps)
  • Pix (Dailies) 1280×720 VBR (max 2800kbps)

SD Proxy

  • IPOD 16×9 320×180 VBR (max 350kbps)
  • IPAD 16×9 640×360 VBR (max 900kbps)
  • Dax (Dailies) 640×360 VBR (MAX 700kbps)
  • NatGeo 16×9 576×360 VBR (max 350kbps)
  • FULL_SD 4×3 NTSC/PAL VBR (MAX 700kbps)
  • FULL_SD_2800 4×3 NTSC/PAL VBR (MAX 2800kbps)
  • FULL_SD Anamorphic 16×9 NTSC/PAL VBR (max 700kbps)
  • FULL_SD_2800 Anamorphic 16×9 NTSC/PAL VBR (max 700kbps)

If you have a valid support contract and are a registered user, you can contact Cinedeck Support.

Our support will send you a link to the latest official version.

If you don’t have a current support contract, please contact sales here.

TROUBLESHOOTING

This topic is best covered in the Cinedeck Manual 5.0, pg. 290.

However, here’s a quick summary:

  • The easiest way is to turn on “use windows drive mapping” found on the “prefs” page.
  • When turned on, “use windows drive mapping” changes the drive buttons. Instead of displaying drive position icons, all available drives are only listed with their Windows supplied drive letters.
  • Note: If you are mapping an invisible drive as described in “9.9 Drive not visible” on page 285, enter \\localhost\ShareName where “ShareName” is the name you gave to the shared folder or drive you created.
  • If you will regularly connect to this same share, you can check “Reconnect at logon” to have Windows automatically try to connect to the share at startup.
  •  You will almost always need a user name and password to access the share, “Connect using different credentials” presumes the password and current user logged into the Cinedeck do not match the server where the shared content resides so forces the ID and password dialog to open.

You may be attempting to set a TCP/IPv4 Default gateway address along with a static IP address, but it may fail. The IP address and Subnet mask will be correct. But, the Default gateway address will remain blank after you save the settings.

It can sometimes occur on Windows 7 systems and is a known problem. Particularly after a recent network driver update.

There are two possible ways of solving this:

  1. In some cases, you will need to enter the static IP address, Subnet mask, and Default gateway TWICE. That can have the values save correctly. Follow the steps below to do so:
  2. Open the Local Area Connection / Internet Protocol Version 4 (TCP/IPv4) Properties dialog. Select “Obtain an IP address automatically” and choose OK. From the Local Area Connection Properties dialog, choose OK.
  3. Reenter the Local Area Connection / Internet Protocol Version 4 (TCP/IPv4) Properties dialog. Select “Use the following IP address” followed by your specific settings. Choose OK twice.
  4. Perform steps 1 & 2 AGAIN, even though the IP address appears to be displaying properly.

Or:

  1. Run the following Netsh command TWICE through the command prompt window, using the desired static address information.
  2. In the network and sharing center, note the name of the network connection that won’t save the gateway info. e.g. “Local Area Connection 39”.
  3. In the network and sharing center, set that connection’s IPv4 to “DHCP” and close out of the dialogs.
  4. Type “cmd” or “cmd.exe” in the start menu search box.
  5. Right click the “cmd.exe” command prompt result and select “Run as administrator”.
  6. In the command prompt window, enter the text as shown below (using your settings):

netsh interface ipv4 set address “Local Area Connection Name” static [IP address] [ subnet mask] [gateway address]

Example:

netsh interface ipv4 set address “Local Area Connection 39” static 192.168.255.230 255.255.255.0192.168.255.1

  1. Press <return>.

Note: This first command may return an error “Object already exists”. If that happens, repeat the same command line again and it should succeed with no errors.

When requesting support, Cinedeck will often ask you to provide log or dump files. That helps us troubleshoot your system.

A few important notes:

  • DO NOT REINSTALL THE SYSTEM IMAGE
  • Log Files are found in: C:\cinedeck\logs
  • Dump Files are found in: C:\cinedeck\dump

The Cinedeck systems are constantly logging events. Therefore, your unit may have many log files.

They are identified with date and time stamps. So, please assure you have selected the appropriate files.

Zip the files using any standard compression application such as 7zip or WinZip. You can also do this from the Cinedeck system.

Select the required files, right click, and select “Send to” > “Compressed (zipped) folder”.

To request support, please use the Support Request Form. You can upload your zipped log and/or dump files via the form.

Your support contract entitles you to receive priority support. If you need to return your unit for repair, Cinedeck will:

  1. Attempt to troubleshoot it remotely first.
  2. If this fails, ask you to ship your unit back to our HQ, or deliver it locally if local support is available.
  3. Check your unit and, if necessary, replace any parts within 5 business days of receiving it.
  4. Ship the unit back to you at our expense.

 If Your Unit Is Out of Support

An out of support unit will undergo a similar process to a unit with a current support contract. But, shipping charges both ways will be the responsibility of the owner.

Parts and labor charges will also apply.

We will provide you with a price estimate before we do any work to your unit.

Sometimes, you may need to restore your Cinedeck system. Follow the steps below to do that.

  1. Contact Cinedeck Support to obtain a download of the appropriate system image.
  2. Prepare a USB drive.
  • For systems running version 3, you will need a USB drive at least 8GB in size.
  • For systems running version 4, you will need a USB drive at least 16GB in size.
  • For systems running version 5, you will need a USB drive at least 32GB in size.

If you are unsure, confirm the required disk size with our support.

  1. Quick format your USB drive as FAT32.
  2. Extract the contents of the zip file you receive from our support to the USB drive. There should be 5 folders and 3 files copied to the USB stick.
  3. On a system with Windows 7 installed, open the command prompt window.
  4. Click the start button and type “cmd” in the “Search programs and files” field.
  5. You should see cmd.exe show up under programs.
  6. Right click and select “Run as Administrator.”
  7. Type:
  • D: (or whatever the USB key drive letter is)
  • CD UTILS\WIN32
  • BAT
  1. Follow the instructions to make your USB bootable.
  2. Once the procedure’s done, close the command prompt window and eject the USB stick.
  3. Now, you can restore the system:
  • Make sure to disconnect any USB drives or external drives from the unit.
  • With the unit powered off, turn off the drive bays by turning the knobs left.
  • Insert the Cinedeck restore USB stick and a keyboard only.
  • Power on the unit.
  • Tap on the “Delete” key continuously until you enter the BIOS setup screen.
  • Navigate to the Save and Exit tab.
  • Under “Boot Override” section, select the USB flash drive (*not the one with UEFI in front of it) and press enter.
  • The system will boot to the USB and begin the restore process.
  • Once the restore process is complete, it will display “Press enter to continue”. Press “Enter”. Type “0” and hit “Enter” to shutdown the system.
  • Remove the restore USB and power your unit on.

In certain cases, you may need to update your video card drivers as well.

That will depend on what version of the software you were running previously. If you’re not sure whether you should do it or not, please include that in the Support Form.

Explain that you are unsure if whether you need to update the firmware or drivers. Also, add what version of the software you are currently running.

Your system may have arrived with a USB restore key. If not, then you can easily create one. Follow the process we’ve outlined under “How can I create a Restore Key and restore my Cinedeck system?”

Once you have your restore key, follow the steps below to restoring the system:

  • Power the unit off and disconnect any USB drives or external drives from it.
  • Turn off the drive bays by turning the knobs left.
  • Insert the USB drive with the restore key and a keyboard only.
  • Power on the unit.
  • Contnuously tap on the “Delete” key until you see the BIOS setup screen.
  • Go to the “Save and Exit” tab.
  • Under the “Boot Override” section, select the USB drive (*not the one with “UEFI” in front of it) and press Enter.
  • The system will boot to the USB drive and begin the restore process.
  • Follow the prompts.
  • Once the restore process is over, the unit will display “Press Enter to continue”.
  • Press “Enter”.
  • Type “0” (zero) and hit “Enter” on your keyboard to shut the system down.
  • Remove the USB drive.
  • Power on the unit.

You may need to update the Cinedeck application and video card drivers. It will depend on the version of the software that you are using. Please notify our Support team if you’re unsure whether you need to do that. Include your current software version too.

For a more detailed description of the procedure, please see the user manual.

Yes, at Cinedeck, we frequently use remote log-in to troubleshoot for customers.  Our preferred remote log-in program is TeamViewer.

We offer:

  • Attended remote support (during our office hours), as well as
  • Unattended remote support (after our business hours)

To install TeamViewer and set up attended remote support:

  1. Make sure your unit is connected to the Internet.
  2. Download TeamViewer for Windows.
  3. Once you download TeamViewer and started the file, it will provide you with “Your ID” and a “Password”.
  4. Please pass this ID and Password to Cinedeck’s Support Team when asked.
  5. Sometimes, you may need support after business hours. If that is the case, Cinedeck will need unattended remote access.

To set up unattended remote support:

  1. Install TeamViewer following the steps above.
  2. Click on the “Connection“ tab at the top of the TeamViewer window.
  3. Select “Set up unattended access …”.
  4. In the first step, set a computer name and a password for the remote computer.
  5. In the second step, add this remote computer to your partner list. Refer to “TeamViewer – Use the Partner List” on more details for how it’s done.
  6. Open your partner list and right-click on the computer name you would like to connect with (step 2). Choose “Remote control” as your preferred connection mode.

For more details, refer to the Full Guideline for Unattended Access Setup.

TRAINING

Yes, we offer self-guided, assisted, and full training sessions. You can familiarize yourself with the Cinedeck setup, installation and operation.

You can also receive onsite training and training for your group. Or you can simply learn more about operating a Cinedeck.

Please, don’t hesitate to contact us to learn more.

Yes, please contact Cinedeck Sales through the Contact Us form.

CINEDECK POLICIES