
[cs_content][cs_element_section _id=”1″][cs_element_row _id=”2″][cs_element_column _id=”3″][x_custom_headline level=”h3″ looks_like=”h3″ accent=”false” class=”cs-ta-center” style=”color: hsl(0, 0%, 100%);”]User Interface[/x_custom_headline][cs_element_text _id=”5″][/cs_element_column][/cs_element_row][cs_element_row _id=”11″][cs_element_column _id=”12″][x_button size=”global” block=”true” circle=”false” icon_only=”false” href=”#projects” title=”” target=”” info=”none” info_place=”top” info_trigger=”hover” info_content=”” style=”font-size: 14px;”]Project Management & File Naming[/x_button][cs_element_gap _id=”14″][x_button size=”global” block=”true” circle=”false” icon_only=”false” href=”#mcc” title=”” target=”” info=”none” info_place=”top” info_trigger=”hover” info_content=”” style=”font-size: 14px;”]Multi-Channel Control App[/x_button][cs_element_gap _id=”16″][x_button size=”global” block=”true” circle=”false” icon_only=”false” href=”#insert-edit” title=”” target=”” info=”none” info_place=”top” info_trigger=”hover” info_content=”” style=”font-size: 14px;”]File-based Insert Edit[/x_button][cs_element_gap _id=”18″][/cs_element_column][cs_element_column _id=”19″][x_button size=”global” block=”true” circle=”false” icon_only=”false” href=”#8-input” title=”” target=”” info=”none” info_place=”top” info_trigger=”hover” info_content=”” style=”font-size: 14px;”]8-input Mode[/x_button][cs_element_gap _id=”21″][x_button size=”global” block=”true” circle=”false” icon_only=”false” href=”#deck-control” title=”” target=”” info=”none” info_place=”top” info_trigger=”hover” info_content=”” style=”font-size: 14px;”]Advanced Deck Control[/x_button][cs_element_gap _id=”23″][x_button size=”global” block=”true” circle=”false” icon_only=”false” href=”#playlist” title=”” target=”” info=”none” info_place=”top” info_trigger=”hover” info_content=”” style=”font-size: 14px;”]Playlist and Clip Manager[/x_button][cs_element_gap _id=”25″][/cs_element_column][cs_element_column _id=”26″][x_button size=”global” block=”true” circle=”false” icon_only=”false” href=”#master-proxy” title=”” target=”” info=”none” info_place=”top” info_trigger=”hover” info_content=”” style=”font-size: 14px;”]Master-Proxy[/x_button][cs_element_gap _id=”28″][x_button size=”global” block=”true” circle=”false” icon_only=”false” href=”#analysis-tools” title=”” target=”” info=”none” info_place=”top” info_trigger=”hover” info_content=”” style=”font-size: 14px;”]Analysis Tools[/x_button][cs_element_gap _id=”30″][x_button size=”global” block=”true” circle=”false” icon_only=”false” href=”#input” title=”” target=”” info=”none” info_place=”top” info_trigger=”hover” info_content=”” style=”font-size: 14px;”]Input Overview & Settings[/x_button][cs_element_gap _id=”32″][/cs_element_column][/cs_element_row][/cs_element_section][cs_element_section _id=”36″][cs_element_row _id=”37″][cs_element_column _id=”38″][x_custom_headline level=”h5″ looks_like=”h5″ accent=”false” id=”8-input” style=”color: #ffdd00;”]8-INPUT MODE: Double the Number of Record Channels on ZX45[/x_custom_headline][x_image type=”none” src=”https://cinedeck.com/wp-content/uploads/2015/03/UI_8-input.png” alt=”” link=”false” href=”#” title=”” target=”” info=”none” info_place=”top” info_trigger=”hover” info_content=””][/cs_element_column][cs_element_column _id=”41″][cs_element_text _id=”42″][/cs_element_column][/cs_element_row][/cs_element_section][cs_element_section _id=”47″][cs_element_row _id=”48″][cs_element_column _id=”49″][x_custom_headline level=”h5″ looks_like=”h5″ accent=”false” id=”insert-edit” style=”color: #ffdd00;”]FILE-BASED INSERT EDIT: Let go of tape entirely[/x_custom_headline][x_slider animation=”slide” slide_time=”7000″ slide_speed=”1000″ slideshow=”false” random=”false” control_nav=”true” prev_next_nav=”false” no_container=”true” style=”font-size: 12px;”][x_slide]
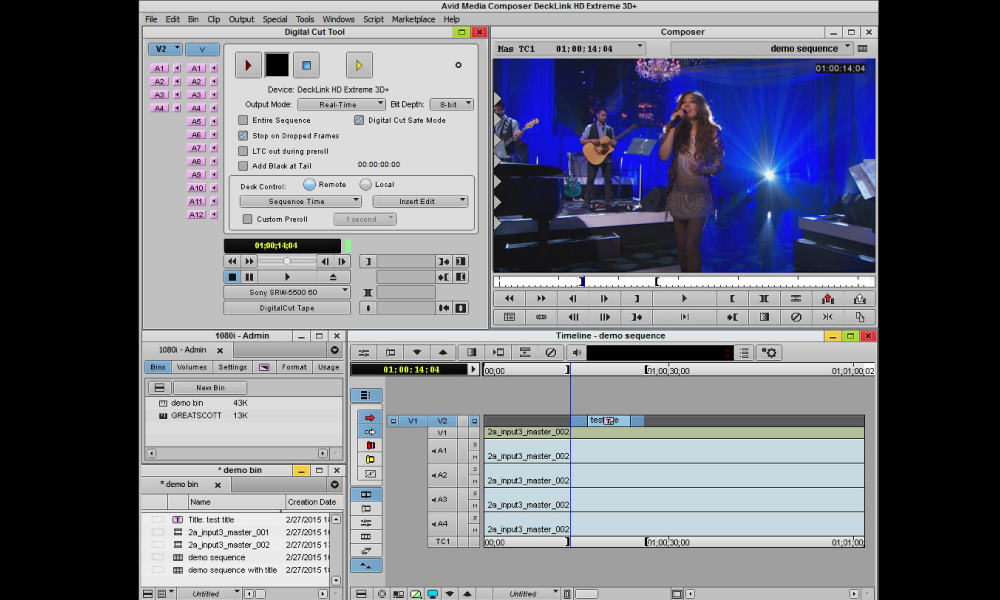
INSERT MODE VIEW – BASEBAND VIDEO

In Deck Control mode, Channel 1 is set to slave and the Record Mode is set to “Insert Baseband.”
*** Note: The Cinedeck application screen at left shows the user interface in Deck Control / Insert Baseband Video mode, setup for control from Avid’s Digital Cut tool for file-based insert edits.
[/x_slide][x_slide style=”font-size: 12px”]
AVID MC DIGITAL CUT SETUP
If you’ve done an insert edit to tape using Media Composer’s Digital Cut tool, completing an insert edit on Cinedeck will be straight forward since Cinedeck recorders emulate an SRW5500 VTR.
Auto configure deck communications, set the in and out point on Media Composer’s timeline, set the required tracks as you normally would and start the insert.
[/x_slide][x_slide]
INSERT MODE IN RECORD VIEW
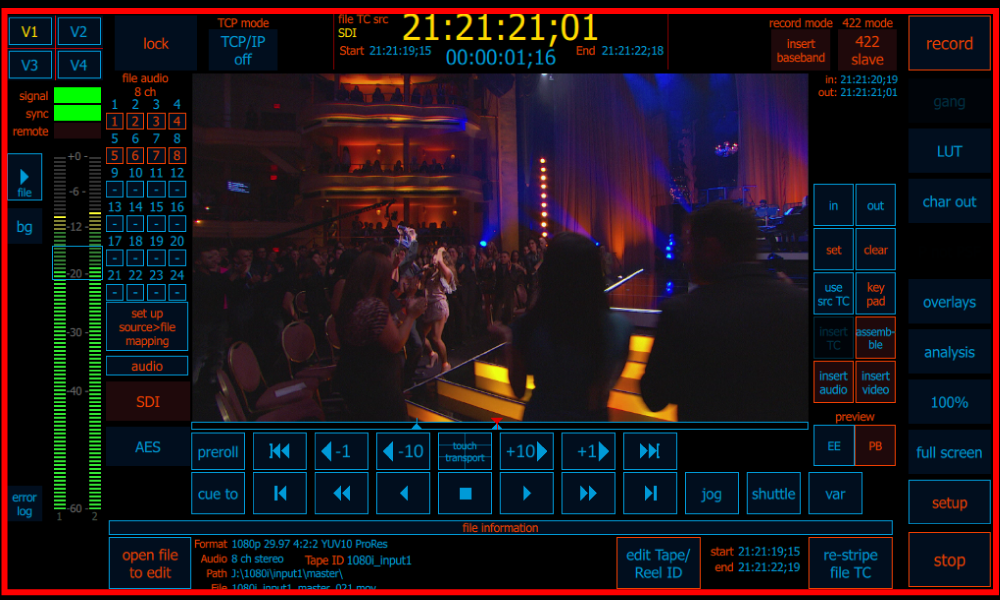
Since the Cinedeck is being controlled by Media Composer, the in and out points set on Media Composer’s timeline will populate the Cinedeck’s timeline. Edit points are indicated by the blue up-arrows on the timeline while the red down-arrow indicates the play/record head position.
Once the Digital Cut tool is set up and you’ve started the insert, the border around the Cinedeck interface blinks red to note “preroll”, then turns solid red for “record”, indicating the new frames from Media Composer are being written over the existing frames between the in and out points.
[/x_slide][/x_slider][/cs_element_column][cs_element_column _id=”55″][cs_element_text _id=”56″][/cs_element_column][/cs_element_row][/cs_element_section][cs_element_section _id=”61″][cs_element_row _id=”62″][cs_element_column _id=”63″][x_custom_headline level=”h5″ looks_like=”h5″ accent=”false” id=”projects” style=”color: #ffdd00;”]PROJECT MANAGEMENT AND FILE NAMING: Unrestricted and extremely flexible[/x_custom_headline][x_slider animation=”slide” slide_time=”7000″ slide_speed=”1000″ slideshow=”false” random=”false” control_nav=”true” prev_next_nav=”false” no_container=”true” style=”font-size: 12px;”][x_slide]
PROJECT MANAGER
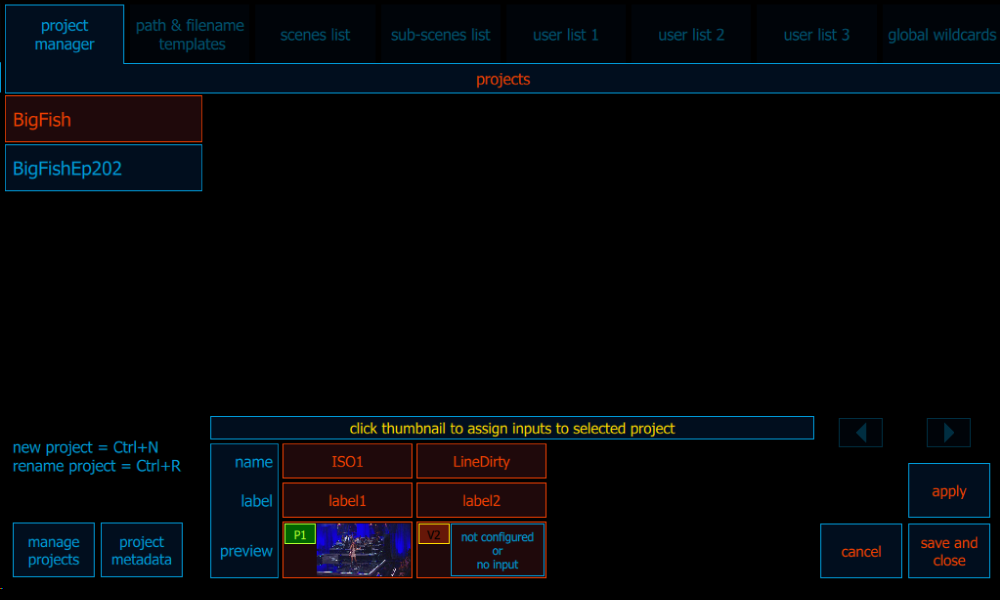
Cinedeck operation is very project-centric. The basic workflow is to create a new project, assign one or more channels to that project and then adjust the settings for that project.
If multiple channels will be operated simultaneously using the same settings, those channels would normally be assigned to a single project so settings are changed globally across all channels. Any channel(s) which need to be operated independently or which need different settings, would be assigned to independent projects.
[/x_slide][x_slide style=”font-size: 12px”]
MANAGE PROJECTS
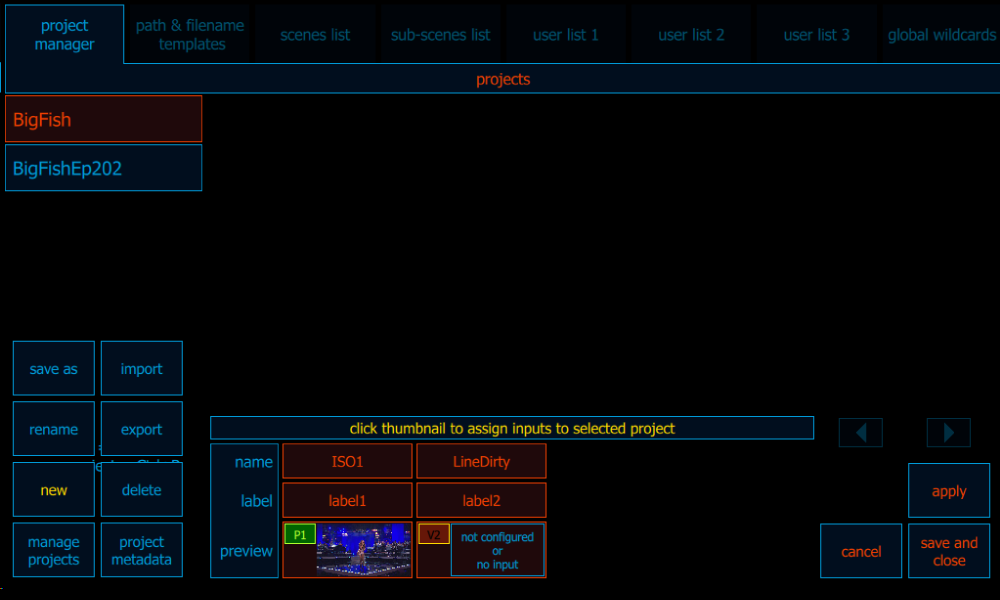
The Manage Projects menu, at the bottom left of the main Project Manager page, provides access for creating new projects and managing existing projects, including importing and exporting.
The input thumbnails, to the right of the manage project menu, are used to select the channel or channels to be assigned to the selected project. (Two channels are shown currently assigned to the BigFish project)
[/x_slide][x_slide]
PROJECT METADATA
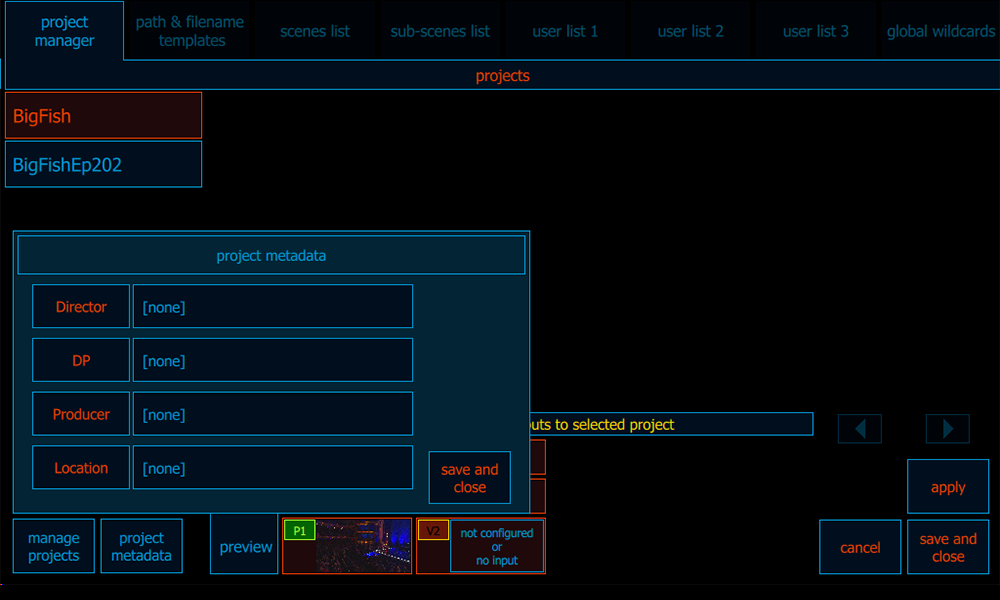
In addition to basic project management, the main project management page provides access for adding project based metadata.
[/x_slide][x_slide]
PATH & FILENAME TEMPLATES
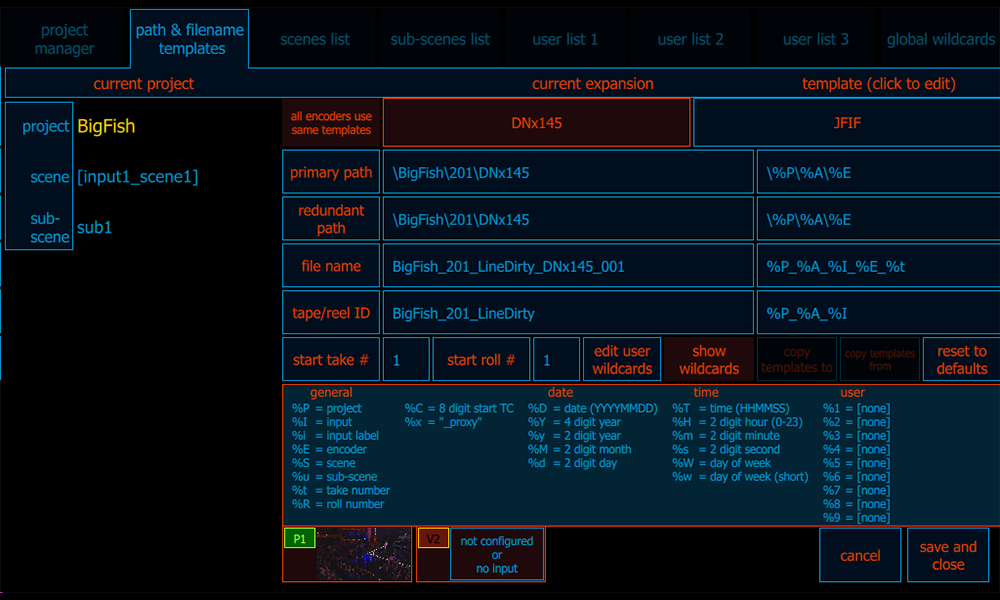
The Path & File Name Templates page is the window into folder and file naming and provides independent control over the primary and redundant file destinations, master and proxy file names, Tape ID, etc.. If required, more specific file destinations can be set independently for each master and or proxy using Project Path Override on their respective encode settings pages.
The BigFish project (shown) utilizes custom encoder names via the %E wildcard as well as %A, a global wildcard for one of the many user definable global and project based lists and variables.
[/x_slide][x_slide]
USER WILDCARDS
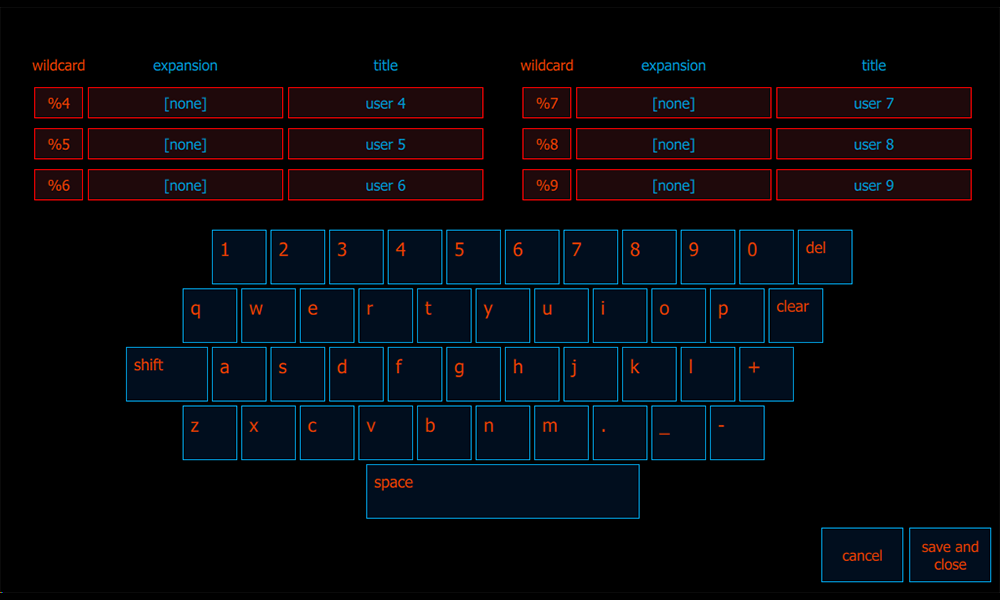 User wildcards are static variables used to hold project based folder and file naming data. A common usage might be a show number or project ID.
The content (expansion) of a user variable can be any alpha-numeric text and each user wildcard has a title which can be named to make it more recognizable when the naming template is viewed and edited.
[/x_slide][x_slide]
SCENES LIST
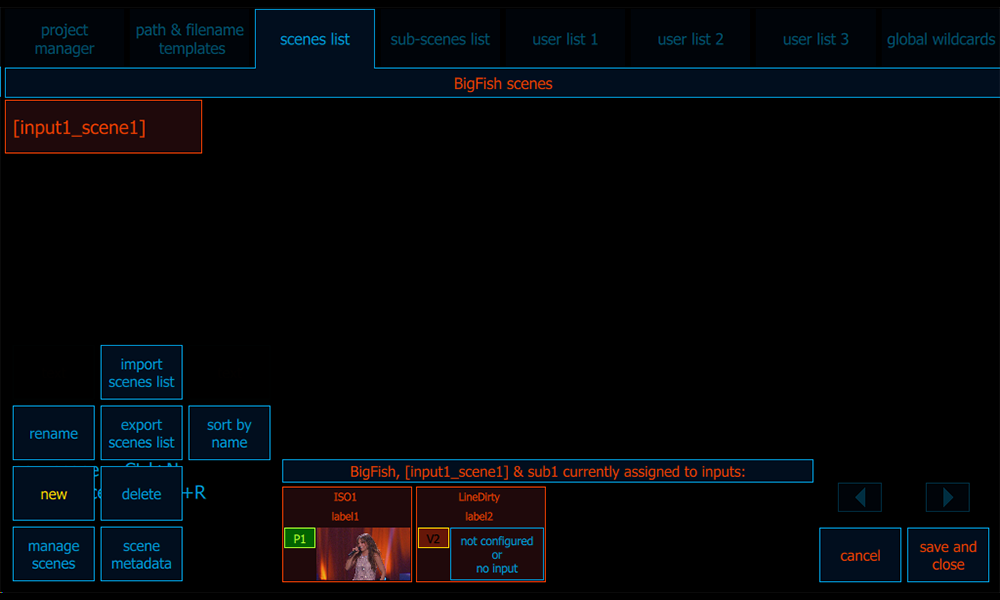
The Scenes and Sub-scenes Lists each can contain multiple naming elements which can be easily selected during a recording session using keyboard shortcuts.
Scene names can be as simple as Scene1, Scene2 or more descriptive such as Kitchen or Office.
[/x_slide][x_slide]
SUB-SCENES LIST
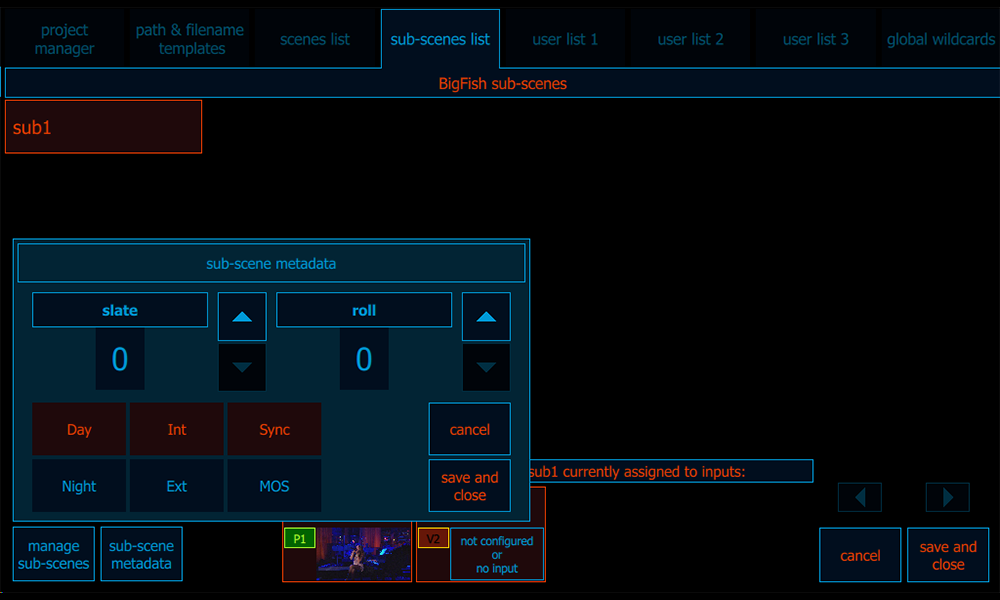
Sub-scenes, just like Scenes, can contain multiple naming elements which can be easily selected during a recording session using a keyboard shortcut.
Additionally each scene and sub-scene can have metadata such as Day/Night, Slate and Roll Number associated to it.
[/x_slide][x_slide]
USER LISTS
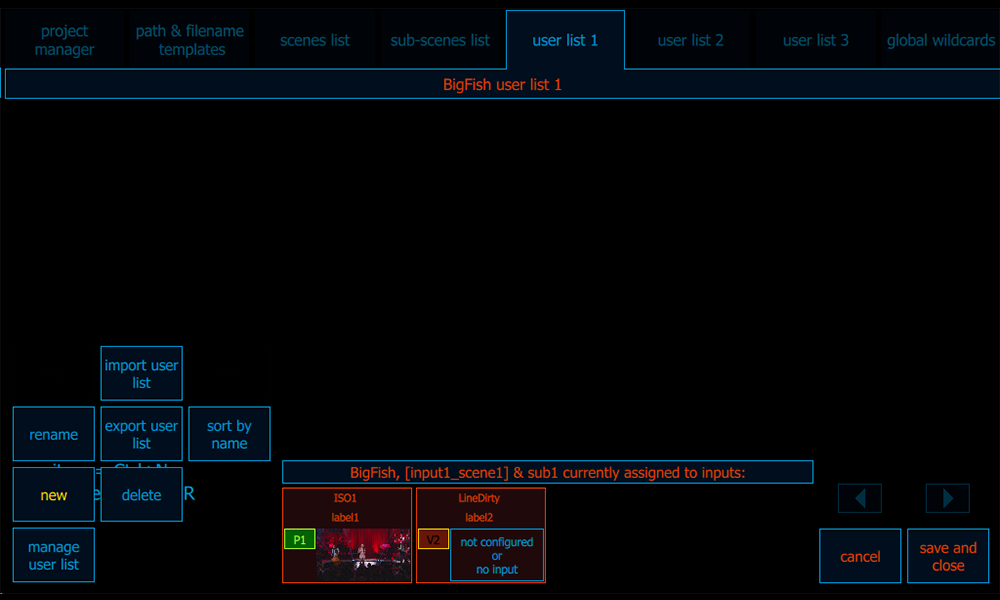
Each project can utilize several user lists. Like scenes and sub-scenes, each user list can also contain multiple naming elements that can be easily selected during a recording session.
These lists provide extreme flexibility for creating explicit and accurate file and folder names at the press of a button.
[/x_slide][x_slide]
GLOBAL WILDCARDS
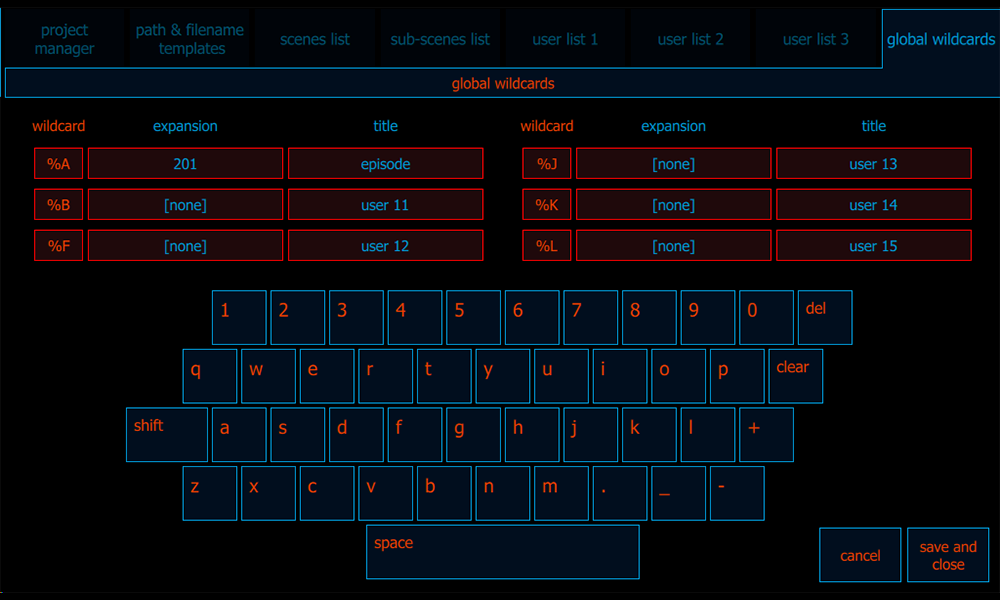
Global Wildcards are also static variables. They work like user wildcards but are system based instead of project based, making them available across all projects.
The content (expansion) of a global variable can be any alpha-numeric text and each wildcard has a title which can be named to make it more recognizable when the naming template is viewed and edited.
[/x_slide][/x_slider][/cs_element_column][cs_element_column _id=”75″][cs_element_text _id=”76″][/cs_element_column][/cs_element_row][/cs_element_section][cs_element_section _id=”81″][cs_element_row _id=”82″][cs_element_column _id=”83″][x_custom_headline level=”h5″ looks_like=”h5″ accent=”false” id=”mcc” style=”color: #ffdd00;”]MCC APP: Control multiple channels with one easy to use interface[/x_custom_headline][x_slider animation=”slide” slide_time=”7000″ slide_speed=”1000″ slideshow=”false” random=”false” control_nav=”true” prev_next_nav=”false” no_container=”true” style=”font-size: 12px;”][x_slide]
MAIN SCREEN WITH SCHEDULING OPTION
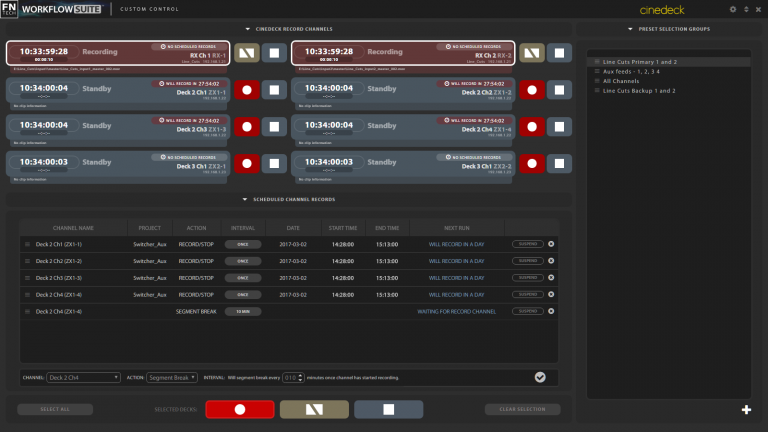
In this screen shot, the first two channels are selected for gang control and are in record mode. Each channel display contains timecode and status information as well as user defined channel and deck names. At the bottom of each channel selector, the current file name, drive and file path are displayed.
The lower section displays scheduled events. Events are set per channel and include a project to determine all of the required settings for the event. Additionally, events can have a file ‘Break’ command included to allow scheduled recordings to be separated into time-based segments.
The column at the right has user defined channel groups. Creating on is as easy as selecting one or more channels and creating a new group. Selecting an existing group, highlights and selects the saved channels.
At the bottom of the screen are the group controls for record, stop and manual file break.
[/x_slide][x_slide]
SETUP SCREEN

Setup of the remote application is simple.
For each channel position, an IP address and channel number is needed, to identify a specific channel on a specific deck.
A deck name and a channel name can be set for each channel position.
The control application version shown has the capacity to run eight Cinedeck channels but the application can be customized to control a virtually unlimited number of channels.
[/x_slide][/x_slider][/cs_element_column][cs_element_column _id=”88″][cs_element_text _id=”89″][/cs_element_column][/cs_element_row][/cs_element_section][cs_element_section _id=”94″][cs_element_row _id=”95″][cs_element_column _id=”96″][x_custom_headline level=”h5″ looks_like=”h5″ accent=”false” id=”deck-control” style=”color: #ffdd00;”]ADVANCED DECK CONTROL: Discard expensive tape stock and tape decks[/x_custom_headline][x_slider animation=”slide” slide_time=”7000″ slide_speed=”1000″ slideshow=”false” random=”false” control_nav=”true” prev_next_nav=”false” no_container=”true” style=”font-size: 12px;”][x_slide]
QUAD INPUT DECK CONTROL
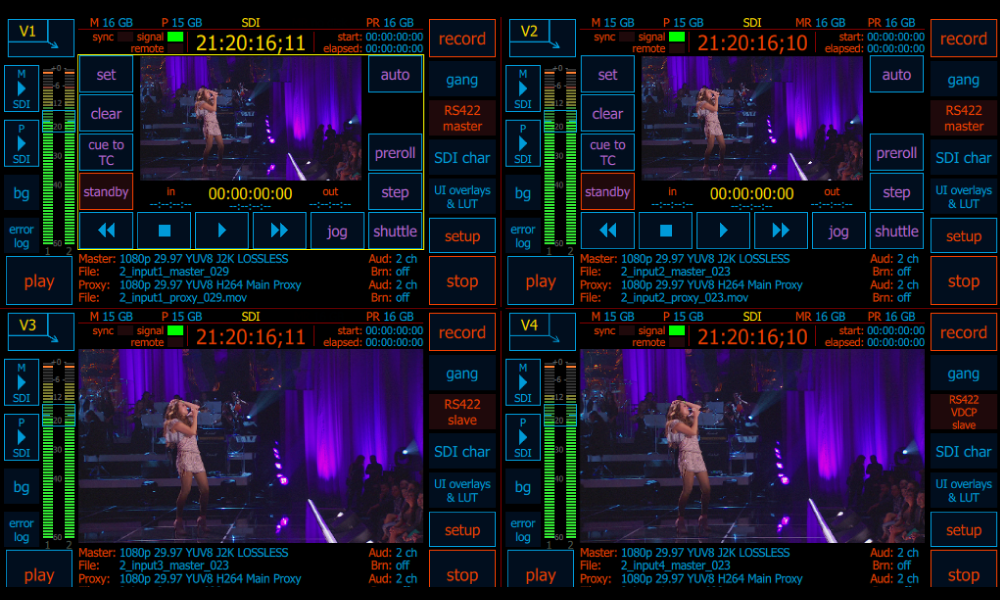
Every Cinedeck channel can be connected to a different device and each channel can be set up in either master or slave mode.
In this quad view of a 4-channel Cinedeck, the upper quadrants (V1 and V2), are both setup in RS-422 master mode, allowing each channel to control another machine via RS-422. In the lower quadrants (V3 and V4), both channels are set to slave mode for control by external devices. Further, V3 is in standard RS-422 slave mode while V4 is set to respond to VDCP protocol over RS-422.
[/x_slide][x_slide]
MASTER MODE
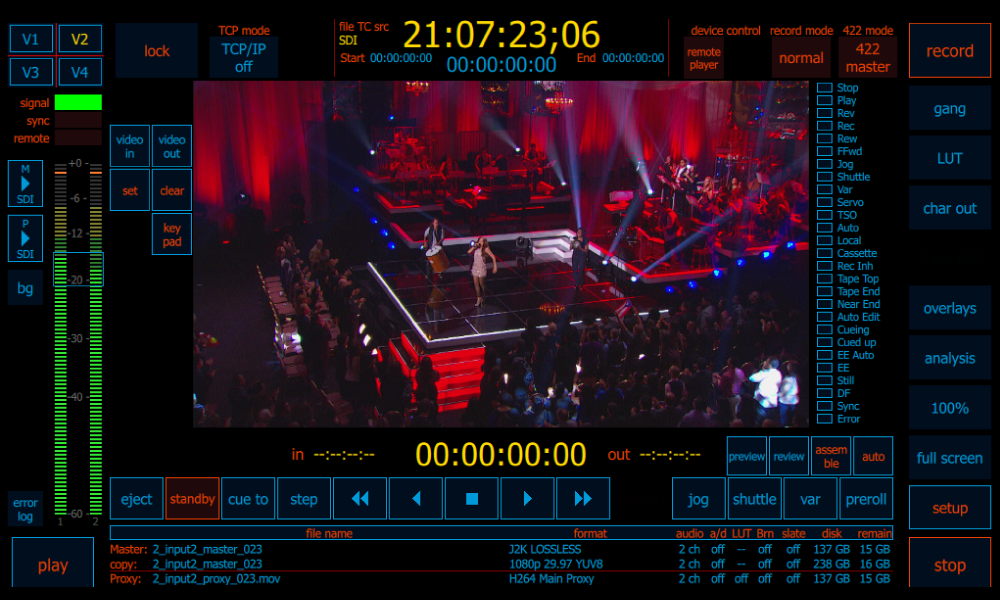
This is the single channel view of Cinedeck’s Advanced Deck Control in master mode, to control another device via RS422.
Since Cinedecks can emulate SRW 5500 VTRs, all the transport controls and status indicators one would normally have access to on a tapedeck, appear in the inner window of the Advanced Deck Control user interface.
[/x_slide][x_slide]
SLAVE MODE
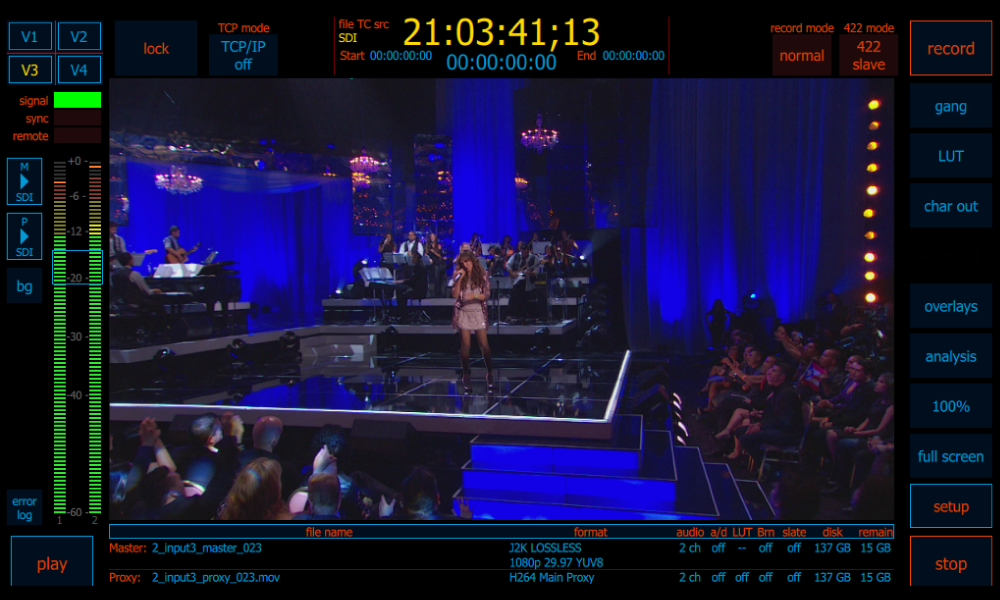
This view shows the user interface for Cinedeck’s Advanced Deck Control in slave mode. Note at the top right, just to the left of the record button, the tab indicating that 422 mode is on and in slave mode. This mode allows standard controllers as well as specialized devices such as a Clipster, Spirit Telecine Controller, or Avid Media Composer, to control Cinedeck via RS-422.
Additionally, Cinedecks support the AMP and VDCP protocols so many systems such as vision mixers and asset management applications can take advanced control over a Cinedeck.
[/x_slide][/x_slider][/cs_element_column][cs_element_column _id=”102″][cs_element_text _id=”103″][/cs_element_column][/cs_element_row][/cs_element_section][cs_element_section _id=”108″][cs_element_row _id=”109″][cs_element_column _id=”110″][x_custom_headline level=”h5″ looks_like=”h5″ accent=”false” id=”input” style=”color: #ffdd00;”]INPUT OVERVIEW & SETTING: User-friendly deisgn[/x_custom_headline][x_slider animation=”slide” slide_time=”7000″ slide_speed=”1000″ slideshow=”false” random=”false” control_nav=”true” prev_next_nav=”false” no_container=”true” style=”font-size: 12px;”][x_slide]
INPUT OVERVIEW
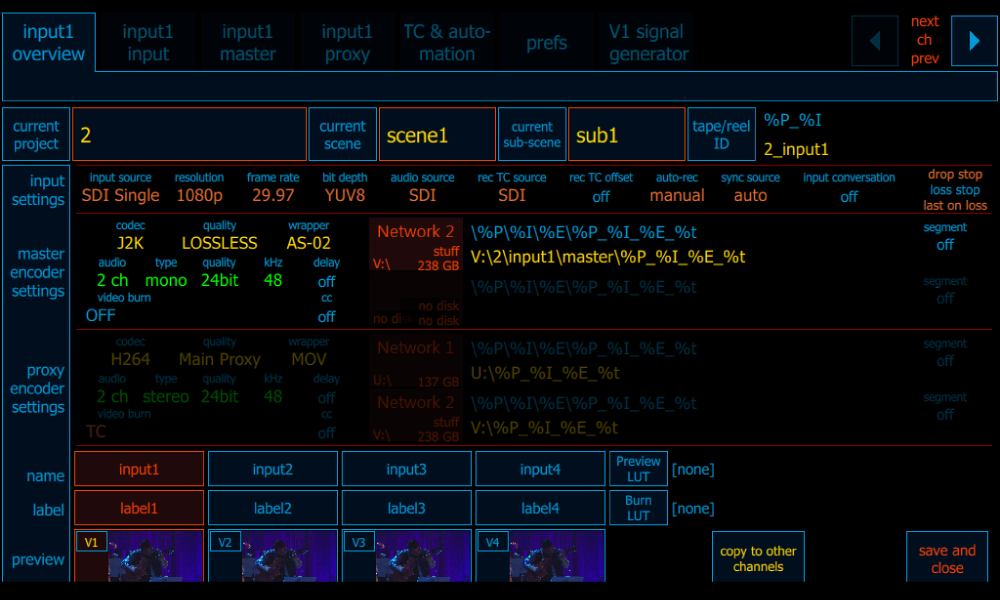
The input overview page provides a complete, detailed snapshot of your channel setup including input and encoder settings which are selected on the master/proxy encoder pages.
Additionally, project selection and setup are accessed from the Overview page.
Beyond the included Project Name, Scene Names, Tape and Reel ID, etc., all of which are also hotlinks to their respective settings pages, each channel can have both a custom label and custom input name to make channel identification easier and these custom labels and names can be used in folder and file naming.
Located on the bottom of the input overview page with the customizable input names and labels are thumbnail previews of the incoming video on each channel.
[/x_slide][x_slide]
INPUT SETTINGS
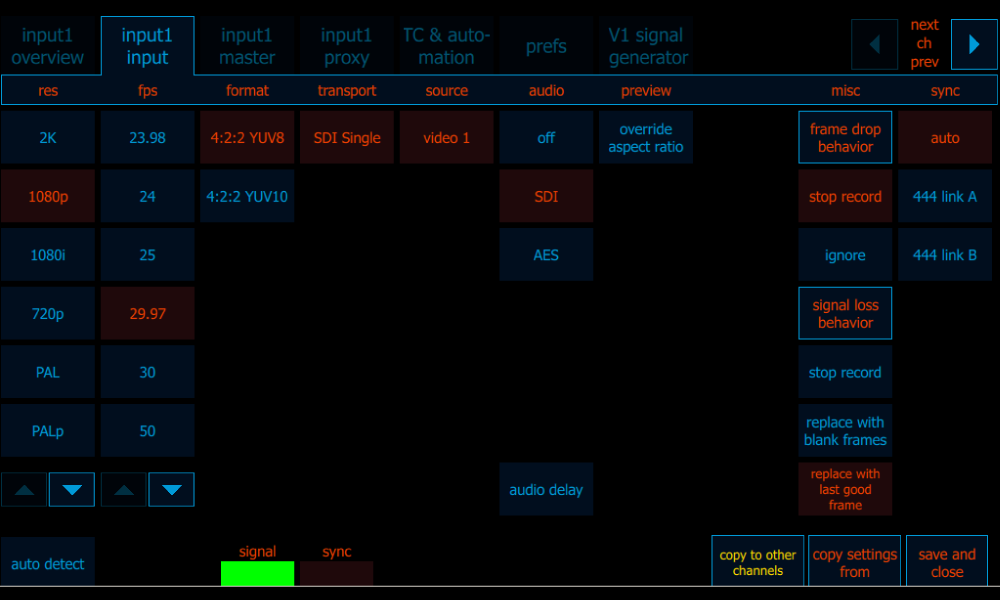
The input page allows you to select settings for the input source for a specific channel. Even better, selecting “auto detect” makes basic setup a snap. Audio is selected manually.
Depending on the platform and software available, a user can record up to 8 independent sources on a single deck with different resolutions, frame rates, formats and audio type.
Toggle the arrow on the top right to select, view and adjust each input or use the “copy to other channels button” on the bottom right to copy settings between channels.
Select “Audio Delay” to set channel specific audio delay in millisecond increments, to compensate for incoming video that is delayed because of outboard processing.
[/x_slide][/x_slider][/cs_element_column][cs_element_column _id=”115″][cs_element_text _id=”116″][/cs_element_column][/cs_element_row][/cs_element_section][cs_element_section _id=”121″][cs_element_row _id=”122″][cs_element_column _id=”123″][x_custom_headline level=”h5″ looks_like=”h5″ accent=”false” id=”master-proxy” style=”color: #ffdd00;”]MASTER-PROXY: Simultaneous recording per channel[/x_custom_headline][x_slider animation=”slide” slide_time=”7000″ slide_speed=”1000″ slideshow=”false” random=”false” control_nav=”true” prev_next_nav=”false” no_container=”true” style=”font-size: 12px;”][x_slide]
MASTER ENCODE SETTINGS
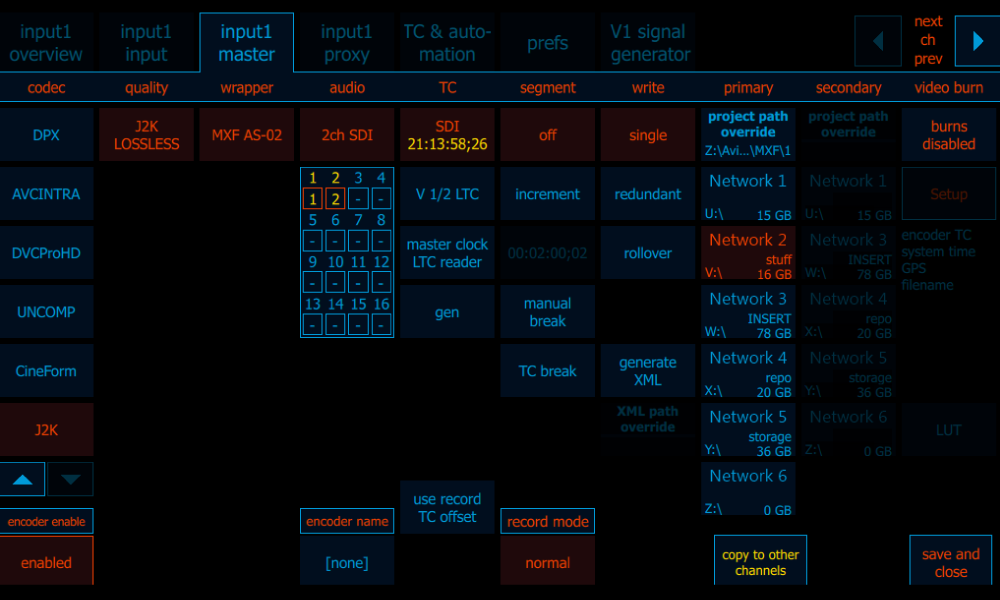
On the master encode page, select from the various codec choices available on each platform. Settings act as filters so each selection can change or restrict the next setting or function. Once the codec is selected, a quality and wrapper can be selected from the available options.
More information on codecs available on the Model Comparison chart.
[/x_slide][x_slide]
PROXY ENCODE SETTINGS

On the proxy encode page, users are able to select proxy encoder options in the same manner as the master. Some settings such as timecode are determined by the master settings.
On RX, the proxy encoder is limited to H.264 when in dual input mode, while on the ZX series, all supported proxies are available.
[/x_slide][/x_slider][/cs_element_column][cs_element_column _id=”128″][cs_element_text _id=”129″][/cs_element_column][/cs_element_row][/cs_element_section][cs_element_section _id=”134″][cs_element_row _id=”135″][cs_element_column _id=”136″][x_custom_headline level=”h5″ looks_like=”h5″ accent=”false” id=”analysis-tools” style=”color: #ffdd00;”]ANALYSIS TOOLS: Onboard tools for on-the-spot QC[/x_custom_headline][x_slider animation=”slide” slide_time=”7000″ slide_speed=”1000″ slideshow=”false” random=”false” control_nav=”true” prev_next_nav=”false” no_container=”true” style=”font-size: 12px;”][x_slide]
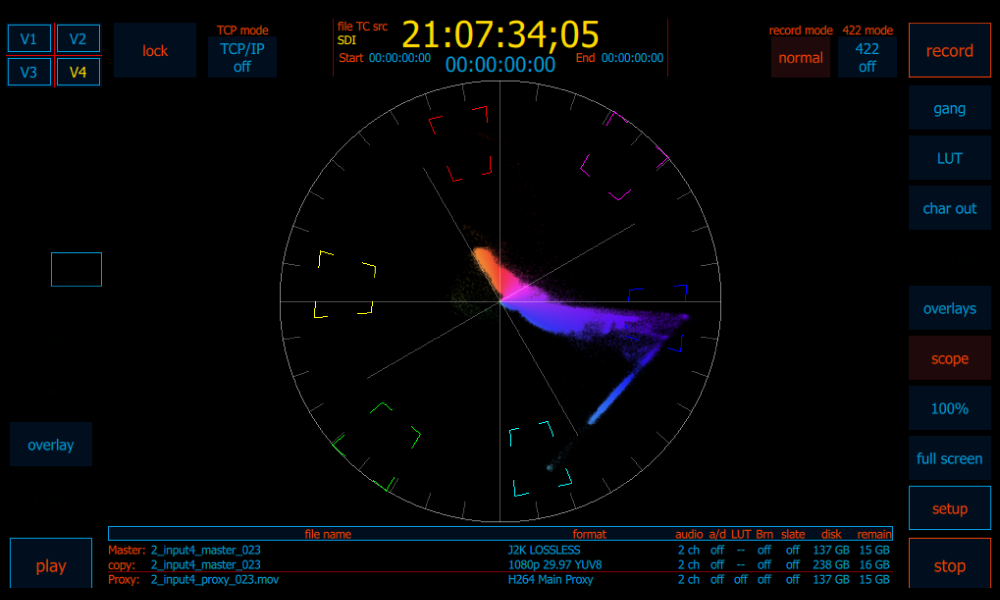
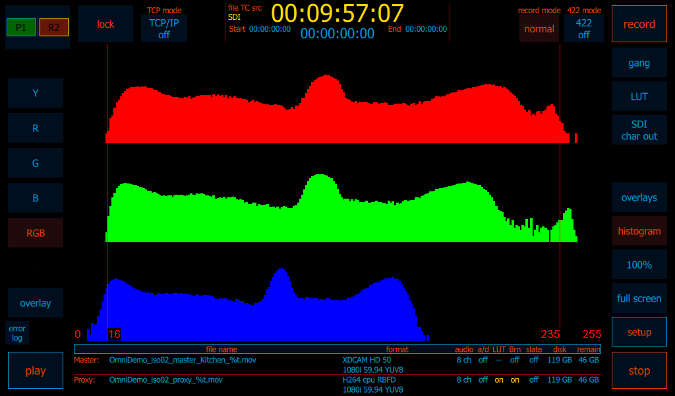
VECTORSCOPE
[/x_slide][x_slide]
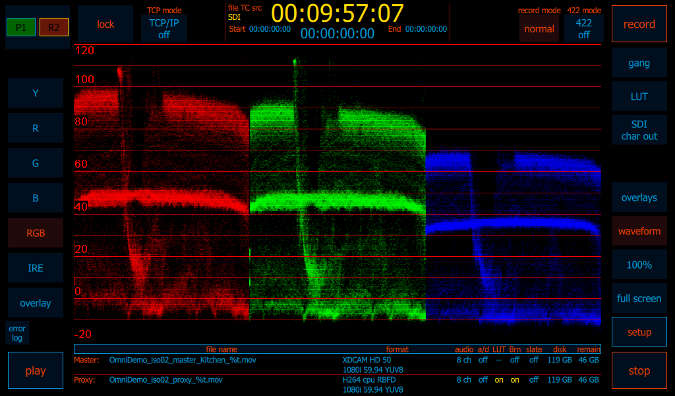
WAVEFORM
[/x_slide][x_slide]
HISTOGRAM
[/x_slide][x_slide]
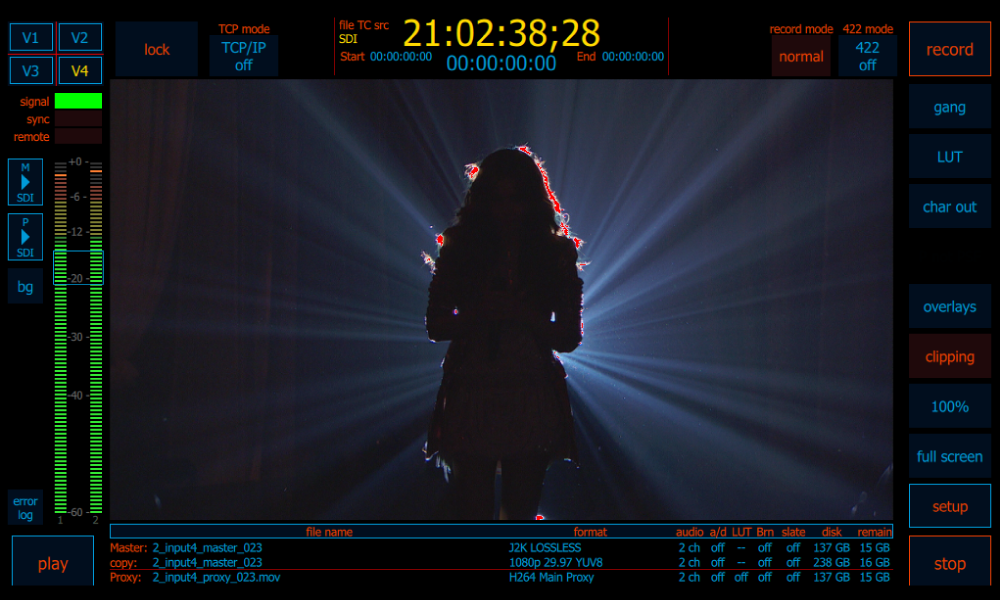
FOCUS ASSIST

[/x_slide][x_slide]
CLIPPING
[/x_slide][x_slide]
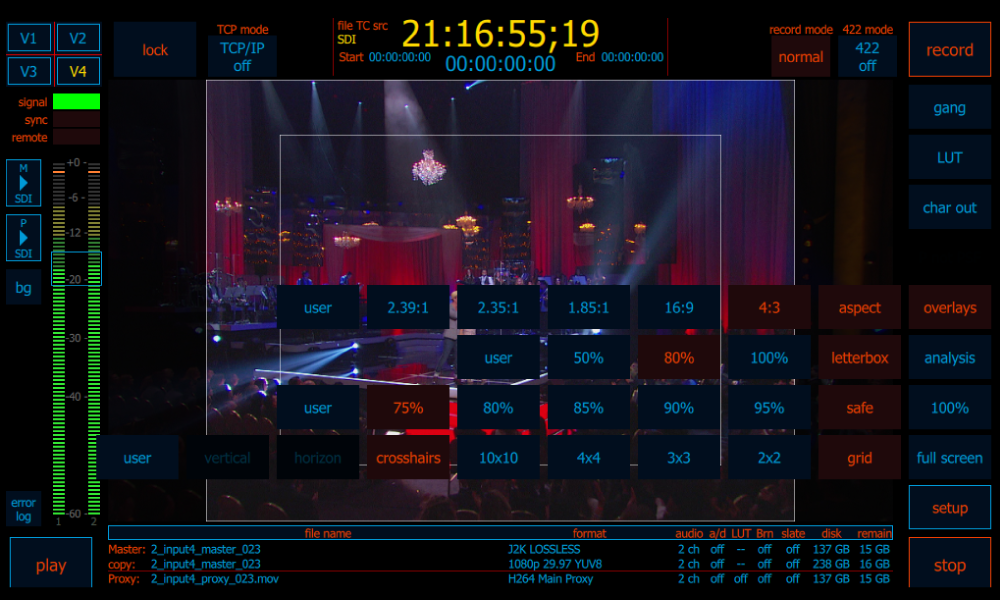
OVERLAY
[/x_slide][/x_slider][/cs_element_column][cs_element_column _id=”145″][cs_element_text _id=”146″][/cs_element_column][/cs_element_row][/cs_element_section][cs_element_section _id=”151″][cs_element_row _id=”152″][cs_element_column _id=”153″][x_custom_headline level=”h5″ looks_like=”h5″ accent=”false” id=”playlist” style=”color: #ffdd00;”]PLAYLIST AND CLIP MANAGER: Easily create playlists and manage clips[/x_custom_headline][x_slider animation=”slide” slide_time=”7000″ slide_speed=”1000″ slideshow=”false” random=”false” control_nav=”true” prev_next_nav=”false” no_container=”true” style=”font-size: 12px;”][x_slide]
CLIP MANAGER
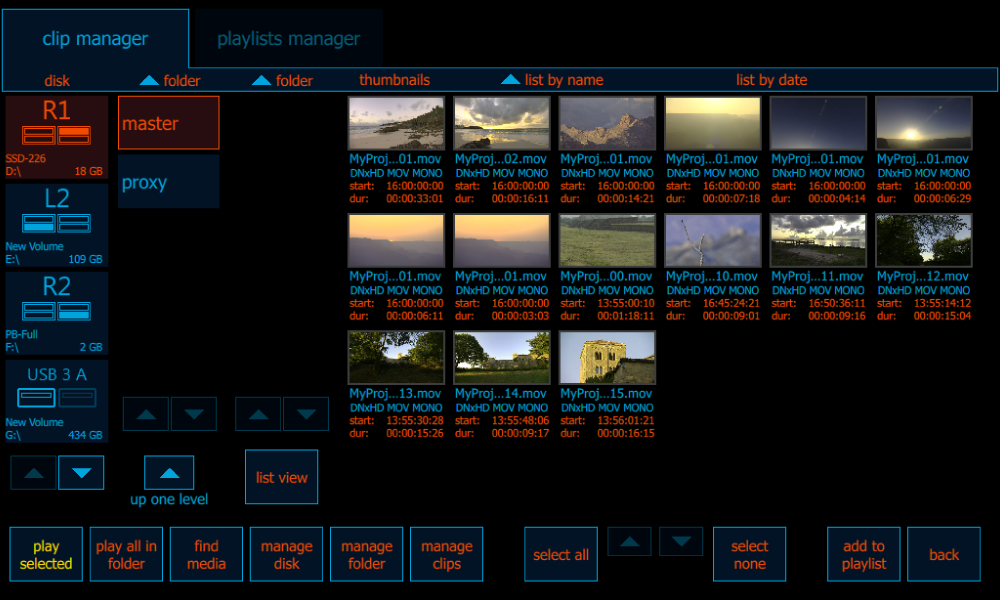
Clip manager provides access to clips for playback and file management. The view is filtered left to right. Select a drive at the left, navigate and select folders in the middle and files can be viewed and managed on the right, in a thumbnail view or list view.
The find media menu button located on the bottom left contains several methods for loading content into the media database.
Important to note is the database is not aware of content being managed using applications outside the Cinedeck environment so if, for example, folder content is changed using Windows Explorer, performing a scan will refresh the view to only show content actually available.
[/x_slide][x_slide]
PLAYLIST EDITOR
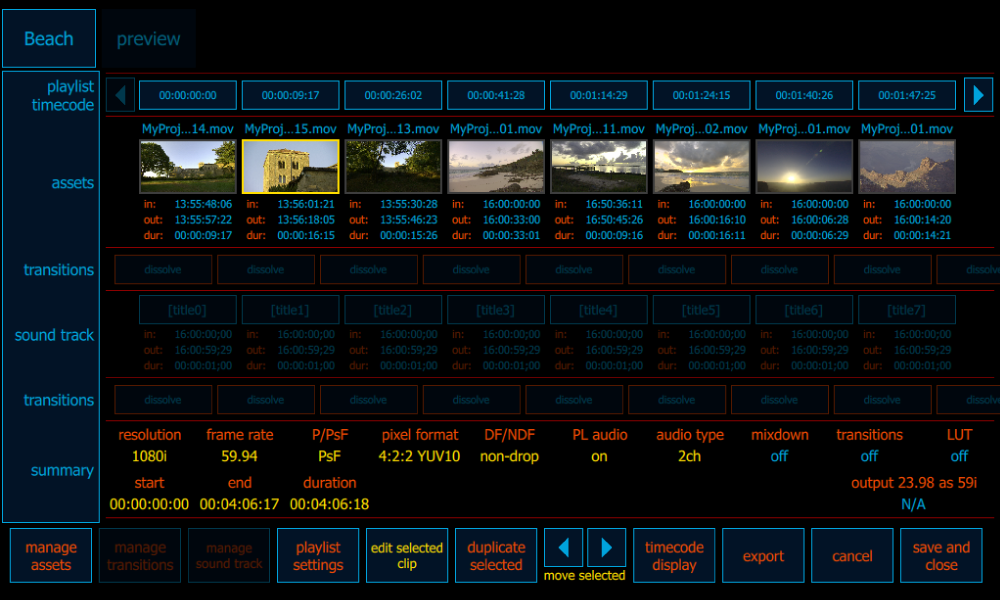
The buttons at the top left (Beach | preview) indicate the current playlist name and toggle between the editing interface (shown) and a preview / play window.
Not intended to be a replacement for a true non-linear editor, the interface has all the necessary information easily accessible including clip name, timecode, in and out, etc. The editor can display timecode based on clip timecodes or playlist timecode.
[/x_slide][x_slide]
PLAYLIST MANAGER
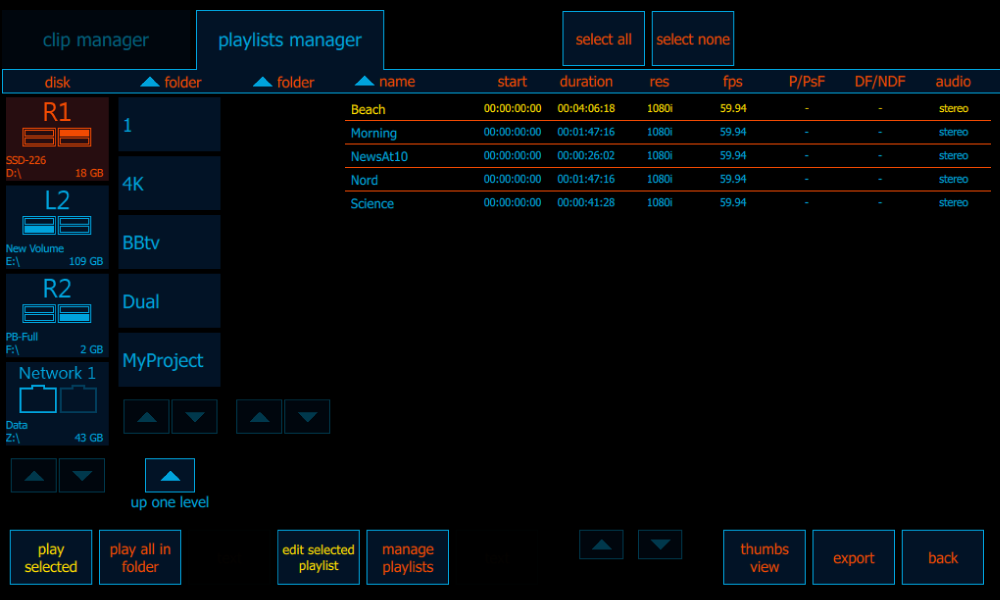
A playlist is a virtual clip which contains multiple clips and sub-clips. In fact, a playlist is nothing more than an XML file which points to the required content to allow various sequential playback and export functions and the playlist manager simply provides access to opening and managing playlists.
From the Cinedeck Playlist Manager you can also select multiple playlists to be played back.
[/x_slide][/x_slider][/cs_element_column][cs_element_column _id=”159″][cs_element_text _id=”160″][/cs_element_column][/cs_element_row][/cs_element_section][cs_element_section _id=”165″][cs_element_row _id=”166″][cs_element_column _id=”167″][x_creative_cta padding=”65px 50px 65px 50px” text=”Have a Question?<br>Contact Us!” font_size=”45px” icon=”arrow-right” icon_size=”75px” animation=”slide-right” link=”” color=”hsl(0, 0%, 0%)” bg_color=”#ffdd00″ bg_color_hover=”#ffdd00″ id=”contact-us-popup”][/cs_element_column][/cs_element_row][/cs_element_section][/cs_content]